2016 Highlights

The new bedroom addition is completed and ferns were transplanted in April to surround it. The Pavilion is in the background right.
The Pavilion- work in progress that is out of money for now.

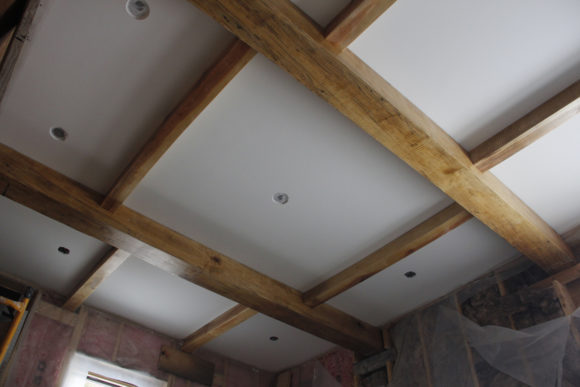
After the ceiling was sheet rocked and finished the 8x8" and 4x4" hard maple beams were raised into final position.

February- After the new bedroom ceiling was sheet rocked and finished the 8×8″ and 4×4″ hard maple beams were raised into final position.

April- Two closets were added for lost of storage.

April- Two closets were added for lots of storage.

April- The final window was installed and the hard maple custom jambs are being varnished.

April- The final Anderson window was installed and the maple custom jambs are being varnished to accommodate the 8″ thick walls. (All hardwood harvested from the property.)

Ferns were transplanted and surface drainage was installed around the new bedroom. The ferns were scooped up with my backhoe from the field out back. This needs to be done very early in the season to be successful. It was!

Ferns were transplanted and surface drainage was installed around the new bedroom. The ferns were scooped up with my backhoe from the field out back. This needs to be done very early in the season to be successful. It was!

View of transplanted ferns in September.

View of transplanted ferns in September.

May- Click-lock, cork flooring was used to cover the bedroom radiant heat cement slab. https://www.homedepot.com/p/Heritage-Mill-Cobblestone-Plank-13-32-in-Thick-x-5-1-2-in-Wide-x-36-in-Length-Cork-Flooring-10-92-sq-ft-case-PF9656/2047

May- Heritage Mill, Cobblestone Plank, click-lock, cork flooring was used to cover the bedroom radiant heat cement slab. This was the easiest floor I ever put down- loved it. Nice and tight!

June- Kitchen tiles going down. What a tough job.

June- Kitchen tiles going down. What a tough job.

Wide view of the kithchen tiles. The center island was removed for this. The tiles took 5 days to lay and two days to grout. Well worth the effort to go diagonal, pine-wheel layout.

Wide view of the kitchen floor. The center island was removed for the tile installation. Working alone the tiles took 5 days to lay and two days to grout. Well worth the effort to go with a diagonal, pine-wheel layout.  (Aspen Sunset porcelain tiles from Lowes). 
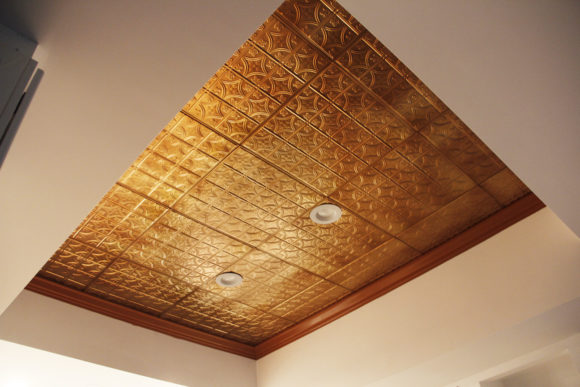
At the end of July a tin ceiling was installed with a cove molding surround to complete the look. Product purchased from American Tin Ceiling in Florida.

At the end of July a tin ceiling was installed with a cove molding surround to complete the look. Product purchased from American Tin Ceiling in Florida.

Summer was fast going by and in the middle of August I finally ran 75 feet of this Rehau- duel, 1 1/4" insulated, PEX tubing , between the basement and the Pavilion. The Pavilion will house the future wood boiler. A 10 inch culvert, 3 feet deep, was run the whole way and the Rehau was pulled through that.

Summer was fast going by and in the middle of August I finally ran 75 feet of this Rehau- duel, 1 1/4″ insulated, PEX tubing , between the basement and the Pavilion. The Pavilion will house the future wood boiler. A 10 inch culvert, 3 feet deep, was run the whole way and the Rehau was pulled through that.

The basement end of the Rehau insulated PEX. Note the the brass 1 1/4 inch valves (middle right) ready for the hook up into the primary heating loop.

The basement end of the Rehau insulated PEX. Note the the brass 1 1/4 inch valves (middle right) ready for the hook up into the primary heating loop.

At the end of August my next project "The Pavilion" was well under way. 4" PVC and 2" stone surround the slab for good drainage. Drains to daylight.

At the end of August my next project “The Pavilion” was well under way.
4″ PVC and 2″ stone surround the slab for good drainage. Drains to daylight.

This was right before the pour. 1/2 rebar was installed at 16" centers as well as extra bar around the perimeter and wire mat in strategic areas. 4ml plastic was used to control curing, The pour was done in three sections with 2x4" screed guides in place.

This was right before the pour. 1/2 rebar was installed at 16″ centers as well as extra bar around the perimeter and wire mat in strategic areas. 4ml plastic was used to control curing, The pour was done in three sections with 2×4″ screed guides in place.

September- the cement crew.

September- the cement crew. You can’t do this alone.

My brother George has experience in building rock walls so I corralled him into helping me for this job. We did about 20' of wall in less than 2 days. I was thrilled to get this done becasue the area has been an eye sore for years and this was the final piece of the overall landscape plan.

My brother George has experience in building rock walls so I corralled him into helping me for this job. We did about 20′ of wall in less than 2 days. I was thrilled to get this done because the area had been an eye sore for years. This was the final piece of the overall landscape plan.

Leave a Reply

Your email address will not be published.