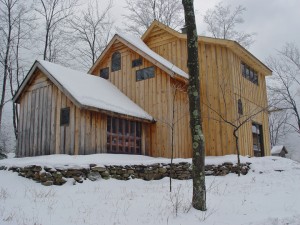
The spring of 2013 started with some long-awaited landscaping to the roadside frontage of our property. The time was right because of what Hurricane Sandy did in the Fall of 2012. Let me explain.
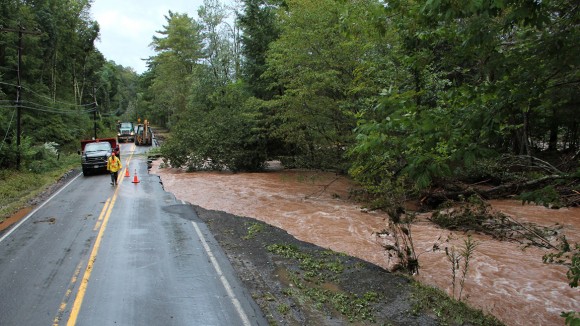
Town Road damage after Hurricane Sandy. October 30, 2012
In front of the house, an acre or so of land stretches out to the road in a beautiful carpet of ferns and forest. It stops abruptly at this roadside ditch drop off of 12 feet. In previous years I had cut down two huge, old, dying trees there and just left the stumps. It was ugly. The plan was to excavate this drop-off, and slope it nicely to the ditch. I started to do this in 2012– before Sandy. I knew from that experience my backhoe really wasn’t big enough for the job- the boom didn’t have a long enough reach. It was a bank almost 150’ long and I had only graded about 15’ of it when I tore the drive shaft out of my dump truck moving the dirt away. The truck had to be partially in the ditch for the backhoe to reach it and the stress was too much for the drive train. I didn’t know how I was going to finish the job.

Twisted drive shaft from 93 Chevy Dump Truck.
Then along comes Hurricane Sandy and raises hell. Up road, the heavy rains caused the creek to jump the crossing culvert and rush down, ripping 2 large gashes into the road shoulder opposite my property. I knew these ravines would have to be filled, so I suggested to the town road crew supervisor that they use my two stumps for fill. Stumps can make excellent creek side buffers against erosion. He said to mark the stumps and he would consider it when they got to my part of the road. After being in the city for a couple of weeks I came back to discover they had removed the stumps and more. I was thrilled with the job they did, removing my stumps and grading the whole bank, sloping it nicely to the road. They needed the stumps, dirt and all, to fill the opposite roadside destruction. It pays to be friendly and cooperative with the road maintenance people.

Newly graded road frontage. November 2012.
So, with this nicely-graded road frontage, it was time to do some landscaping. I planted rhododendron, blue globe spruce, and built some rock wall surrounds. Further down the frontage, past this area, I cut down a lot of small, annoying beech trees, as well as some overpopulated soft maple trees. This was all to make way for a line of Norway Spruce, and a few Austrian Pines. I had been nursing these pines from seedlings for a few years in a plot out back, and they were due to be transplanted. The project took too long, over 2 months, and it is not much to look at now but in 10 years this should make a nice roadside presentation to the property.
So it was not until July that I got going on my new house-building project for 2013. The transformation of the guesthouse into the main house was behind schedule. I needed to convert what was the garage entryway into the new dining area. Not so fast- -this area had no foundation, a 6” cement slab covering it, a vertical beam which supported the whole front corner of the second floor, and the new room would need a roof that would have to be slipped in under the deck above. OK?
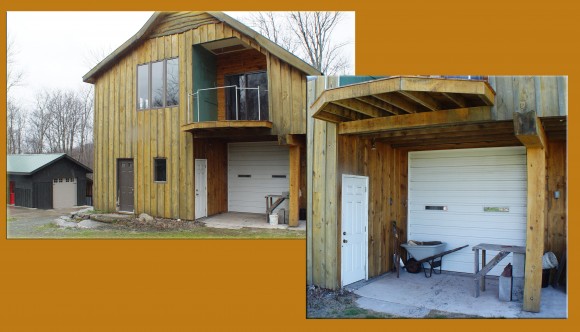
Spring 2013
The way I have learned to deal with overwhelming odds is to take things one-step at a time. First, I carefully removed the cement slab. I removed the slab whole to save time and to reuse it elsewhere. Removing it whole caused some scary moments, as I did not want to send the beam off kilter since it was holding up the second floor. I used my hammer drill to loosen the tight spots and, after some serious pressure by the backhoe, it slid free. The backhoe did not like doing this because the slab weight was so great and it was in there tight. But it came out eventually and the beam stayed put.

Digging the foundation while trying to avoid the 2nd floor support.
Second, I had to cut a large 18”x18” hole through the existing basement wall. This hole was to accommodate a large pipe that was going to be buried beneath the new foundation. The pipe was for future use to allow an insulated heating pipe from an outside wood-burning boiler to enter my basement. The problem was that the steel-reinforced concrete was almost 12” thick in that area. Cutting through the concrete took over a day with my new ½ Bosch Hammer Drill. I really broke that baby in. I felt sorry for the tool when I was done, but it still works well. Go Bosch! The job was done using a combination of two bits- drill and chisel. A sawzall was used to cut through the rebar.

John cutting a 18″x 18″ hole through the 12″ thick basement wall with a Bosch hammer drill.
Further complicating all this was the need to run an insulated heating pipe from this house that had the new oil fired boiler, to the other house. I only wanted one boiler to heat both houses. Also the outside wood boiler would send heat under my new dining area foundation, into the basement heating system and then onto the other house through this pipe I needed to run. Do you follow? (More on that subject- Installing a Hot Water Boiler).
After the hole was cut in the basement wall, I took the opportunity to run this “Grand Scheme of Things,” heating pipe. It was a flexible, insulated, 6” pipe, with 2 one-inch pipes inside of it, a feed and return. I already had run an 8” pipe between the two house years ago just for this purpose. I didn’t want to try and snake this 65’ long pipe through the door, down the basement stairs, wind it past the oil tank, into the 8” basement hole and then try and pull it through to the other house. That would severely aggravate my old hernia. The pipe was flexible but not that flexible. I also failed to mention that, along with this pipe, I was running a RG6 coax cable for TV and 2, just in case, CAT5 cables for Internet.

65 feet of HeatSeal, dual 1″ insulated underground pipe, by Heat Link.
Now was the time to do this, “pain in the ass project.” I imagined I could lay the whole damn 65’ of pipe straight out and run it through this new hole I had cut in the basement wall, then straight into the little 8” hole at the bottom of the basement wall. Problem was, my pull rope kept snapping off from a snafu in the previously buried pipe between the houses. Each time this snafu caused me to pull the pipe back out, fish the pull rope back through, reattach it and start over. I did this about three times. Talk about aggravation- unfortunately, Deb got snarled at a couple of times during all this. “Sorry Deb.” Finally I succumbed to the realization that I had to dig up the existing pipe where the snafu was and fix it.

Digging up the snafu.
After that, the pipe pulled through with ease as planned. It took over a day of fits and starts but I got it done. Glad that is over and I hope the heating system all works as planned. Will not know for sure until I hook everything up, which probably will not be until 2015 or beyond.

Into the basement, through a hole in the other side, through the ground and out the side of the other house- 65′ later. Pulled gently by the backhoe. HeatSeal 6″ flexible pipe.
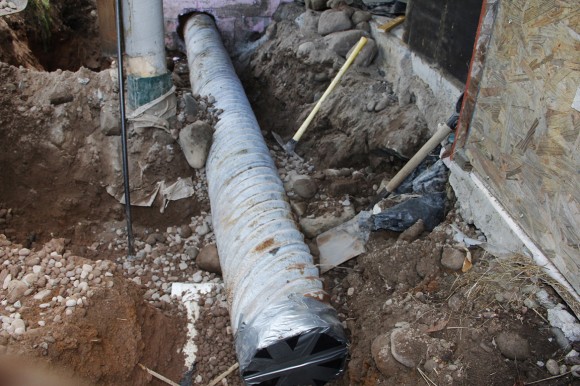
Old culvert given to me by the town highway department. This will eventually be where I run the heating pipe from my outdoor wood boiler.
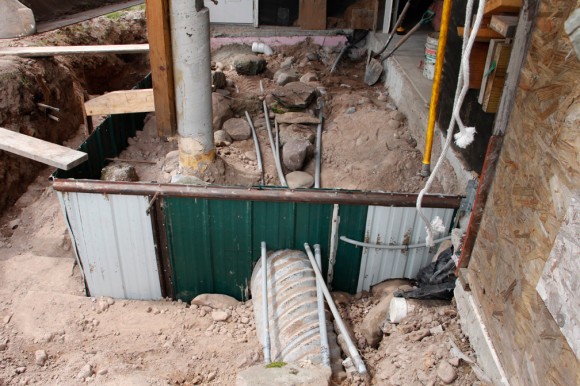
Along with the heat access pipe, I ran conduit for satellite TV & Internet, outdoor temperature reset sensor, outdoor wood boiler power and thermostat control wires.
It wasn’t until the middle of July that I started building the forms for the foundation concrete pour and the first week of August before we actually did the pour. I say we meaning Deb and I. By now she had done three major concrete pours with me. Not many women on this planet have done that nor would want too. She knows the strengths and stamina required, the urgency of setting concrete. She tolerates my steady, firm commands. In the TV business where I work, some new kids are taken aback when they hear me go into that mode, and are offended by it. I guess most of them never played sports or had a job and, if they did, it wasn’t paving blacktop or pouring concrete. I digress.

Ready for concrete pour.

Deb shoveling concrete, helping to put the finishing touches on the foundation pour.

The walls are 4″ higher than the floor to accommodate 2″ of rigid foam insulation and 2″ of radiant floor thin slab concrete. Note the air intake for the indoor woodstove, center left and right wall. The concrete pillar, in the background, will be removed when the walls are up.
After the pour, there is always a euphoric sense of relief and excitement for the building of walls. It doesn’t last long, as you get bogged down with details like removing the beam that holds up the house and slipping in the roof under the 2nd floor deck. And it had to be done by the end of September.

The new roof had to be slipped in under the upper deck. I had to remove most of the deck boards to do this. Very expensive waterproof underlayment by WR Grace was used. Later I added metal roofing on top of this.
What was the urgency? I had to run radiant floor tubing in the kitchen and dining area, and then pour a thin, 2” slab of concrete over the tubing before winter. Why before winter? Because I wouldn’t be able to get a concrete truck up to the house in winter. If I didn’t get the thin slab poured in the fall that would screw up all my plans for winter.

Roof and walls up. Opening left in wall for bringing in the cement. Windows also need to be framed in. Mid September 2013.
As the cold weather started to blow in, and the heartburn flared up, I started to get careless. I made a last minute angle adjustment to a board I was about to nail up and almost cut my left index finger off with a circular saw.  To make matters worse, a couple weeks later, I cut off the fingernail of my right middle finger in the table saw. Whoa!!! Slow down you moron!! The index finger is permanently damaged. I didn’t go to a hand surgeon as my doctor recommended because I was afraid of what it would cost and the actual benefit of the surgery was questionable. But mostly I want it to remain a reminder of how stupid I was.
This sense of urgency in the fall is a reoccurring theme. Deb says, “There is always something that needs to be done.” You have to ask yourself why do I do this? Why not just watch sports on TV? Or play golf? Or go to parties and hang out with friends and family? Instead, it has been an endless stream of challenges, accomplishments, satisfactions and then onto the next challenge. The winter is usually the time when I do not push myself as hard. But even then I do not allow myself the time to cross country ski as much as I should. When it gets late in the winter afternoons I keep pushing to get some task done and then it is dark. I usually try to ski just before sunset and finish in the dark with a headlamp but as the years slip by I do it less, knowing time is running out. Why is time running out? Well as I have discussed before, when I retire there will not be any extra money to build dreams.
In October I attempted to do something that I have lost some sleep over in the past few years, not a lot of sleep but thinking about it has kept me awake at times. The plan was to move the wood stove to the new dining area on the other side of the chimney. That means cutting another hole in the existing chimney. This can be tricky for someone who has never done it before- like me. You do not want to damage the structural integrity of the chimney for a couple of reasons: the chimney could fall down or, worse yet, you could burn the house down if you compromise the clay tile liner inside. I put up dust control tarps and go at it with my Bosch, 4” diamond blade cutter. It gets done without a hitch. What is that poem- “only I remain and the fear is gone” or something like that.
Now that I successfully cut a new hole in the chimney, the wall between the two rooms needed to be torn down and replaced with a cement block wall. I want the woodstove to sit safely in front of a masonry wall, not a wood wall. No more fires- please. So I jacked-up the adjacent upper floors and ripped the old wall out.

Ready for blocks.
Rodger Grimsby
For some reason, I decided not to lay the block wall myself. I wanted it to look good and get done fast, so I hired a local guy, who gave me a reasonable price. Getting him to the job site wasn’t easy but ounce he showed up, it was done in a day. It was worth the hassle to hire someone for the job.
After the block wall was up, it was time to put down 2” rigid foam insulation on the floor of the kitchen and dining area. The original concrete slab was not insulated so this should do the trick. I have read different ideas about how much insulation to use in this situation but this is the solution I went with. Could there be more insulation? Of course there always could be more, but the theory is that this R10 insulation is of much greater resistance to heat flow than the ceramic tiles and the thin slab. Therefore, the radiant floor heat will radiate up into the living area and not go down into the ground.
On top of the rigid foam, I ran 3 independent loops of ½” pex tubing for the radiant floor heat. Not an easy task to do alone but I made my own homemade tubing dispenser and it went fairly well. The tubing is attached to 3/8” rebar from Lowe’s, spaced at 8” intervals. On top of all the rebar and tubing I placed wire mesh. The closets, cabinet, stove and refrigerator areas have no tubing runs because I have read that radiant floor heat is a waste in those areas and can cause problems.

1/2″ PEX radiant floor heat tubing. Note left photo: the kitchen stove island center and sink, counter area on right. Photo right: dinning area. 3 separate adjustable loops were run for both areas. Perimeter pads were pre-poured by hand for screed purposes. It was the only way I could do it with my level of experience and crew.
The next big issue would be pouring the concrete thin slab. There was no way I wanted this to be done by just Deb and I. In fact I didn’t want to put Deb in this situation at all. It was a tough job that needed to be done perfectly because on top of this thin slab would be ceramic tiles. The concrete could not just be poured out of the truck chute onto the floor- it needed to be wheeled in via a wheelbarrow. I needed at least 2 other guys along with me, and 4 people total would have been even better. I had no luck finding anyone at first and even started to call some cement contractors- I was that desperate. It was the middle of November and we already had several snow accumulation events, although none was on the ground at the moment. The contractors I called were not available for my timeframe but finally a guy gave me the name of a college kid who was taking the semester off. I called him and he was game and said he had 2 friends who would also be interested. Great, we set the date for the next week, Thanksgiving week.
As usual, I didn’t sleep well the night before the pour. After I finally went to sleep, I woke up to a beautiful winter wonderland. There was about 2” of snow on the ground and it was still snowing. The 3.5 yards of concrete was coming at 9:30AM. I went out at 8AM and started brooming the snow off the work area and some of the driveway. The driveway was over 200’ long so- so much for that.
The first 2 guys showed up late at 9:15. One of them lived about 20 miles away and he said the roads were terrible, especially the ones near here. Neither of them had ever poured concrete before and there wasn’t much time left for a lesson but I did the best I could. The kid who did have experience did not show up. I heard the big cement truck pull up out front and ran out to greet him. Recognizing the driver from a previous pour, I jumped up on the running board and passed him a twenty saying, “I got two rookie guys helping me out so keep an eye on them.” He smiled and nodded, putting away the $20. I guided him as he backed up the long, winding, snow covered driveway. The wheels didn’t slide until he turned at the top. He quickly controlled the slide. A sigh of relief went through me as he jumped out of the truck and started to put on his cement chute.
At this point I felt almost like I was in a dream and things were moving along out of my control. A cement pour is always a very sobering event because the concrete is going to harden quickly and there is nothing you can do to stop it. The cement was going to get poured in the house with the guys I had and there was no turning back. For some reason I wasn’t nervous or anxious, but a more Zen- like feeling had come over me. Maybe it was the effect of the sleeping pills or the snow-covered winter wonder world. I do not know, but things were going forward.
After the second wheelbarrow was dumped, I was totally in the here and now, heart pumping, wooden hand float pushing wet mud, screed working and calm instructions being given to the rookies. Pouring concrete inside was different in that I didn’t have to shout instructions over the noise of the truck engine. Never having poured concrete, the kid working the other end of my screed needed constant guidance. He went to college for PhysEd but was a little portly; beads of sweat were popping on his forehead. There was a commotion outside where the wheelbarrow was being filled. The driver stopped paying attention and overflowed my rookie’s wheelbarrow, dumping cement in the snow. The driver jumped out and helped shovel up the mess. Both of the young men worked hard, but I realized towards the end I should have had them switch positions. One kid got the concept of add more or less concrete when leveling and the other didn’t.

The the thin slab concrete pour crew. November 26, 2013
In the end it was my fault that things didn’t turn out perfect. I had a homemade 10’ screed that I put together last spring for the previous pour with Deb. I never checked it for true and, being wood, it had warped convex on me while out in the sun over the past months. The screed is what you use to level the concrete by working it back and forth, pulling and pushing the concrete. The convex screed created a ¾” low spot in the large dining room center. This wouldn’t have been a problem if I was going to use 12×12” ceramic tiles but I wanted to use the trendy large tiles and they don’t take to well to not being level. A week later I had to rent a heavy-duty concrete grinder and smooth off the side ridges. I had used one years ago on a summer construction job back when I was in college, so I knew what to do. $350 later and a day- now it should be fine.
My nephew, sister and her husband were coming for Thanksgiving the next day and when they arrived I was still cleaning up the mess from the pour. They were going to be sleeping in the finished upstairs apartment. Always moving forward, in the down time between libation and feasting, I took advantage of Dylan and Ken to help me set a 3”x12”x13’ hard maple beam. This beam was to help support the new dining room roof and a ceiling pitch transition. I wanted a tight fit and doing it alone would not have been fun. It went in easier than we thought and I used a hydraulic bottle jack to force it the final inches home. Just in time for turkey dinner.

Dylan Davis and Ken Mantai ready to hoist the beam.
The next day, nephew Dylan, who was a hair stylist by trade, said he wanted to learn carpentry. So I put him to work studding up the opening I had left in the wall to bring in the concrete. A large 3.5×5’ window was going in the opening and I wanted the boys to help me put it in place. They were leaving the next morning so we had to get after it. I put Ken to work varnishing the unseen inner wood frame of the window. I always do this to help stabilize it. Once we finally got the window in place, in my excitement to nail the window in and get out of the cold, I forgot to check for final level. I knew the windowsill plate was perfectly level but once the window was in place, it tilted down 5/8” because of the factory mull job, (factory joining of 3 different windows). Once you chalk the window flange and drive in 2” galvanized nails all around, you do not want to turn back. Ken and I discussed it and decided the discrepancy could be hidden with the interior trim and outside siding. This turned out to be true because when you look at it now, all finished—you would wonder what all the fuss was about.
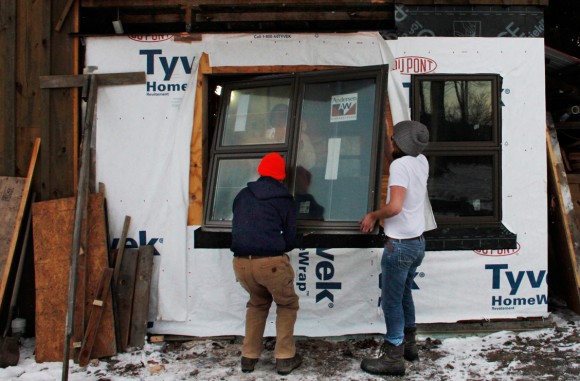
Ken and Dylan hoist the Anderson combo window into place while John guides it home from the inside where it is warm.
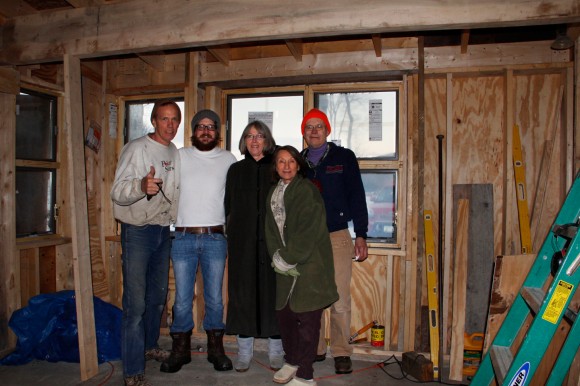
Our Davis, Mantai, Thanksgiving group. Me, Dylan, Chris, Deb and Ken. We hope to have more people as the place expands. Note the 4″ x 12″ beam installed above.
The holiday was a success and I could now move forward with my winter plans no matter what happened with the weather. I love this time of year because it is the only period when I can ease up on the pressure I place on myself. If I have heartburn, it goes away then. That winter there was a slight hiccup in that “The Max”, my 4-wheel drive dump truck with plow, would not start. So I had to go to plan B and put my ‘86 Chevy plow truck back in action. That piece of shit, nasty truck always starts. It’s nasty because when the thing idles it either roars or barely putters in an ornery manner. The transmission is sloppy and mice run throughout its rust holes. When you shut it off after plowing, it usually backfires like hell.

3/4 ton, 86 Chevy
I thought when I bought the diesel mason dump truck I could get rid of that thing; glad I didn’t because it saved my ass that winter. The winter of 2014 was the coldest winter in years in the North East and that piece of shit ‘86 Chevy started every single time.
So in the end, the year all went well. Maybe I am living the dream? My body tells me the dream is ending because that fall my legs started to go numb again every now and then. As the fall progressed they went numb more and more often. I did not know why and looming ahead of me was some terrible consequence I was sure. “Why don’t you get it checked out?” people asked me. Well, I did just two years ago and it cost me $2000 out of pocket to find out that my B vitamin level was low. What I needed were B vitamin injections to calm my pinched nerve. They didn’t know I had a pinched nerve because the expensive big time neurologist was too occupied with other things to pay attention to my description of a classic problem. Well, now the injections of B vitamin were not doing the trick and the numbness was becoming more frequent. I did not have a lot of confidence in the medical system in this country so I avoided it- thinking time heals all, literally.
Anyway, I, for the most part love this business of building, building and more building. Deb has gotten used to it and buys into it. We have a town to build–so let’s get ‘er done!
Get it done by 2017 or bust!


