06
Mar 19

Outdoor Woodboilers Part II

To burn or not to burn?

The bottom line is this; having a high demand for BTU’s and stacking your cold firebox with small splits of dry wood, mixed in with medium size splits, creates a minimal amount of pollution. If those conditions are met- the wood boiler will spew out heavy white smoke at first and then trail down to no visible smoke within 1/2 hour. You can add dry wood later, when large amounts of red coals are still burning and only have visible smoke for about 5- 10 minutes, then the stack will go back to clear or minimal smoke conditions. I do not burn all day and night, only one cold start in the early morning and maybe adding wood one or two more times depending on the outside temperature or if we are doing laundry. By then the house is warmer than I want and I let the oil boiler take over for the rest of the day, setting the thermostat for 61 degrees at night. Currently we are heading into the end of the heating season and after a year long quest to minimize the woodboiler pollution problem, I think I have figured it out.

Stacking your wood like this will allow the critical burn temperature to be reached quickly and no smoke will be visible from the stack within 1/2 hour causing minimal pollution.

Upon initial start up this is the kind of smoke you will get. With dry wood and a properly stacked firebox- no smoke will be visible within 1/2 hour.
In less than 2 hours my firebox burns down to this condition. This is the perfect time to add more wood. For best results add some small stuff with the bigger splits. In my experience as long as there is demand for heat the new wood will only smoke mildly for 10 minutes or less and then revert back to a smokeless condition.

In the spring of 2018 I had a lot of time to think about my wood boiler pollution problem since I was home recovering from a second hip replacement. I found some free online courses at Heatspring Magazine about buffer tanks and how to configure them into a system to create efficiencies. https://blog.heatspring.com/2-pipe-versus-4-pipe-buffer-tank-configurations/.  I knew that a buffer tank would help greatly in smoothing out my issues with the wood boiler and wanted to learn more about them. John Siegenthaler was the instructor and at the end of the brief course he referenced this article: https://www.pmmag.com/articles/86583-a-signature-system-br-john-siegenthaler . It was written in 2003 and references a heating contractor in Alaska who incorporated a large inverse, indirect hot water heater to use as a buffer tank.

This article on water heaters rang some loud bells in my brain because the previous winter I ran into a problem with my on-demand propane water heater failing during 10°F and below outside temperatures. Icing in the propane tank valve would restrict the flow of the propane. The kitchen stove would work fine but the narrowing of the valve orifice from icing would cause the propane hot water heater to shut down because the propane demand could not be met. We would be without hot water till the temperature warmed up or the sun came around and hit the propane tank. The point being, I couldn’t rationalize a large 200-gallon buffer tank filled with expensive antifreeze but I could rationalize a 72-gallon inverse, indirect hot water tank if I gained additional benefits.

The TurboMax arrived at the end of August

            During the fall of 2018 I was determine not to let what happen to me the previous winter happen the next. I wanted to be ready for the cold weather as soon as it hit and use the wood boiler from the get go. In the beginning of September I started working on the new primary piping configuration to incorporate the TurboMax. The pressure was on because I had to shut down the heating system to do it. The wood stove would have to suffice in the mean time. 

The TurboMax operates inverse to a normal indirect hot water tank in that the boiler water circulates around copper domestic water coils.

The guy in Alaska was using what is called an inverse indirect hot water tank. The TurboMax http://www.thermo2000.com/content/en-US/s2_produits/optimizer.aspx is inverse in that it has copper coils for domestic hot water running through it, instead of the typical other way around; hot boiler water running through copper tubes in a domestic, indirect, hot water tank. The largest tank TurboMax sold held 119 gallons of boiler water; the largest tank that would fit in my basement was the 72-gallon version. This is the kind of hot water heater that would be normally used in a large home or apartment building with multiple units. For me it could work as a buffer tank for my boiler water and secondarily heat my hot water. This is what the contractor in Alaska used it for; buffering a very large system in a residential home.

My new hydronic heating system design incorporating the TurboMax

Incorporating the TurboMax required rerouting the primary piping circuit. The primary circuit was now going to include the TurboMax, it would run directly through it. I did not add another pump for the TurboMax because the primary circuit already had one. The TurboMax had 1 1/2” fittings so with the primary circuit being 1 1/4″; I did not think it would add enough extra flow resistance to require a dedicated pump. Part of re-configuring the primary circuit required piping closely spaced T’s for the Guest House secondary circuit and installing a pump. 

Getting the TurboMax into the basement required some creativity.
This is the expansion of my primary circuit to include the TurboMax. The pump and insulated duelpex are visible center. I included a bypass so if someday I needed to make changes, it could be done without shutting down the house heating system.

         I commissioned the new system including the TurboMax by mid October and was very pleased with the results. Previously, I was always concerned that sometimes the oil boiler would go on and off for short periods of time and it seemed to short cycle, (even though the people at Biasi said reaching 125° was good enough). After installing the TurboMax in the primary loop the short burst stopped and became longer, more sustained. Apparently because of the large volume of hot water stored in the TurboMax, the low temperature, radiant floor heating system was satisfied for longer periods of time. The boiler would fire for longer because of the larger volume of water in the system. That was what this new plan was all about. The TurboMax would buffer either boiler. When the freezing weather eventually hit I was able to confirm that the 72 gallons in the TurbMax did indeed buffer the Wood Boiler. Usually the TurboMax would be sitting at anywhere from 90° to 115°, hot enough to satisfy the house demand. When I fired up the wood boiler, those additional gallons allowed the damper to stay open long enough for the OWB firebox to reach the critical burn temperature for the smoke to stop and not pollute so much before it started to close. When the wood boiler was burning the TurboMax would stay at 125 to 155ºF, depending on the outside temperature or whether laundry was being done or showers were in use.

    I installed a Caleffi mixing valve on top of the TurboMax for domestic hot water and routed the return through the Rheem, tankless, propane on-demand hot water heater. I did not connect the TurboMax aquastat to the system because that was not my priority. Although I wasn’t sure about that, it turned out to be a beautiful thing. Cold water would first circulate through the Turbomax, then 16′ later, enter the tankless hot water heater. So if the hot water hadn’t been running, the tankless would always fire initially to heat the 16′ of cool water in the 3/4″ pipe and continue to fire or not depending on the temperature of the TurboMax and the set point of the tankless water heater. We set ours at 112°F. I started to use a lot less propane because the temperature going into the tankless was much hotter than the 40-50° temperature coming out of the deep well. In extremely cold weather, I never ran out of hot water because the OWB was usually burning, keeping the TurbowMax anywhere from 120°F to 155°F, causing the on-demand hot water heater not to fire. One morning at -8°F it did shut down temporarily but the water became hot once the TurboMax flow reached the spigot. Problem solved!

       The insulated, 1″ duel Pex, heat pipe for the guesthouse had been run in previous years but the distribution and radiators were not. I wanted all this to be done by Thanksgiving for my house full of guest but because of supply issues the Biasi radiators had to be back ordered form Italy. So the TurboMax system worked but no hydronic heat went to the guesthouse. The good thing was I was able to use the wood boiler for Thanksgiving. It was sorely needed because we had the coldest Thanksgiving weekend up in the mountains I have ever experienced getting down to 9°F one morning.

In December the radiators came in and I was able to install them in the guest house. I hooked up the overheat aquastat to the woodboiler and set it at 185°F to turn on the guesthouse pump for the dump zone radiators. It works like a charm so I don’t have to worry about the damper closing down and causing a smoky condition. Getting to this point was not easy but overall I am feeling pretty good about burning hardwood from my land to help heat my home. Solar panels will be coming eventually to reduce my carbon footprint.


26
Dec 18

Outdoor Woodboilers: To burn or not to burn?

I first started to notice outdoor wood boilers in Western New York State during the 1970’s. I didn’t think much about them except that for people with a lot of available free wood, they were probably a good idea. I moved away from my home town of Mayville, New York but one winter in the early 1980’s, I went back to visit my parents. I noticed something different, a few hundred yards up the street; I saw an OWB puffing away. This was right in the Mayville village limits. My mother mentioned that smoke was always coming out of it. It was white smoke. The smoke seemed to primarily blow in a direction away from the houses nearby and out across a large former cow pasture. My mother didn’t complain about the smoke nor did she mention anyone else complaining. As far as I know it is still there.

While not the actual wood boiler from my home town, this is a good example of how bad they can smoke at times.

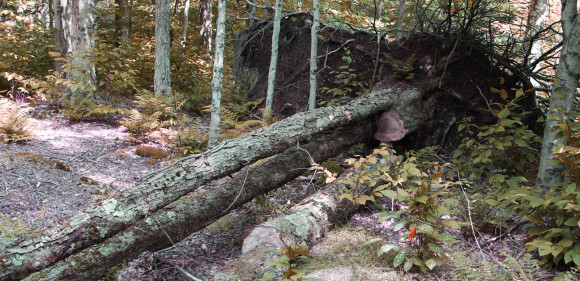
Later I bought vacant land in the mountains and ended up with 32 acres of hardwood forest. In the very beginning I put a wood stove in the one room cabin I built and burned a lot of wood, till I burned the cabin down one day. This has all been explained in a previous post but the point is I started to think about the safety of an OWB verses a wood stove and also the health advantages of keeping the smoke and mess out of my house. Every year, more or less, large hardwood trees blow down by storms or age weakness on my property. These logs are just rotting away on the ground. I’m thinking carbon from these fallen trees is being released into the atmosphere as they decay, so I might just as well burn the carbon for heat.

Outdoor wood boilers are very common in rural New York State where my property is because there is so much free wood around. The houses are not very close together and so most of the nearby municipalities have not needed to regulate them. But in 2011, New York State has started regulating the type of new OWB that can be sold. These boilers must be EPA approved for a minimum efficiency rating. I started thinking about using an OWB back in 1996; a lot has changed since then.

A lot has changed since 1996 but for me three things have not: my unending supply of good BTU producing hardwood, my need for a low cost way to heat the house after I retire and knowing that the energy required to get the wood from the forest floor into the firebox would be a good way to stay fit as I age.

Back in 2012, when I started to put in motion plans for a hydronic heating system in my new house, an OWB was part of the plan. Wood burning hot air furnaces need to be attached to or in the house but hot water boilers don’t need to be. The heated water can be sent through insulated underground pipes from a distance. So an OWB was a good supplemental fit for my hydronic-heating plan. Charlie, the local plumbing supply company guy who worked on a heat loss plan for me said, “You don’t want one of those wood boilers you load up and forget about all day do you? You know the kind that smoke all day?” I said no and he proceeded to recommend a European wood boiler from an Italian company. Biasi is marketed in the USA by QHT in New Hampshire and Charlie’s company sold them. In fact the Biasi wasn’t an outdoor wood boiler at all, it was a fairly efficient indoor wood boiler. QHT does not recommend their wood boiler to be used outdoors. The Biasi was supposed to be a much more efficient wood boiler than the other more common ones sold in the USA for years and by virtue of that efficiency, also less polluting. Europeans are far ahead of the USA in terms of pollution control, efficiency and hydronic heating advances in general. Radiant floor heating and low temperature panel radiators have been popular in Europe for years but they are just getting started here. I bought all this.

Biasi 120BTU Wood Boiler

It wasn’t until later that I asked Charlie if the Biasi wood boiler was certified in NYS. He said no, it wasn’t an outdoor wood boiler; it didn’t need to be certified because it was an indoor wood boiler. That was true then and still is at the time of this writing. The point is the Biasi wasn’t a big polluter. You don’t fill it with wood and forget it. It needed to be filled probably 2-4 times a day in the middle of winter, burning a smaller and in my mind a hotter and hence cleaner fire. Charlie said the fire would not last the night but if you throw a bucket of coal in the firebox before you go to bed, in the morning you can start your new fire with the left over coals.

The fact that this was an indoor wood boiler and not an outdoor wood boiler did not bother me in the least. In my vision of this operation, I never saw the wood boiler out by itself off in the distance.

I saw it a distance away but under a pavilion, surrounded by stacks of air drying firewood. My car would be parked under the pavilion as well. The fact that I had to enclose the boiler in an insulated room worked for me. The selling point of the Biasi being of higher efficiency and less of a polluter was what got me excited, not whether it was indoors or out.

In the fall of 2017 I was hurriedly trying to finish the Wood Boiler Room under the pavilion.

From the time I received the cost estimate for the two boilers, one oil-fired and the other wood-fired, until the time I actually bought the wood boiler, a few years had passed. The oil-fired boiler had been installed along with all the radiant floor heating and low temperature panel radiators. The system was working better than I had expected. In spite of it working so well, I didn’t take full advantage of it during the winter because I was too cheap to burn all that expensive fuel oil. I would heat the house mostly with my EPA approved wood stove and only late at night would the oil boiler take over. For years, the OWB had always been a key part of my heating plan and I was getting tired of stoking the wood stove every hour. I wanted to use the highly efficient and very comfortable radiant floor heating system I had installed. It was time to build the pavilion.

But now, money was tight, my 65 year old body was falling apart and I started to think, do I really want to go ahead with this wood-burning boiler thing? I dug deeper into the environmental aspects of OWBs and although this opinion is controversial, coming from the most environmentally conscious camp, the bottom line seems to be that it would be better to let the wood rot on the ground, allowing the carbon to slowly go into the atmosphere than burning the carbon up at a fast rate in a wood boiler. Wood rotting on the ground creates a state of equilibrium, burning the wood for heat does not. They say in the end, burning a fossil fuel, like oil or gas, is less polluting than renewable, hardwood fuel. I’m a firm believer in global warming, so this bit of new research slapped my conscience right in the face so to speak.

In this latest round of my research I learned about New York State, EPA approved wood boilers. These are called gasification wood boilers. There are quite a few manufactures out there and they all had one thing in common, they were twice as expensive as the more conventional Biasi wood boiler I was looking at. From what I can tell, they burn a small, very hot shot of a fire and create little pollution, hence EPA approved. The other thing they have in common is they all want you to have a large water storage tank, a big water storage tank to hold hot water, the bigger the better, like at least 200 gallons. This large tank works by storing the hot water produced by the wood boiler and buffers that with your hydronic heating system. Under this scenario you may only need to build a wood fire once a day. One sales guy I talked to from Econoburn, in Brocton, NY had a 1000-gallon tank in his barn. He claimed only to have to burn his boiler for a day and then would have enough hot water stored in the tank to heat his house for four days. Now that’s efficiency!

Modern 200 gallon Buffer Tank for storage of hot water.

I really liked the idea of having an EPA approved wood boiler but there are two major problems with it. Projecting out the added cost of a gasification wood boiler, at today’s prices, I could buy enough additional fuel oil to heat my house for at least 10 years. The other problem was I am only at the mountain house for half the winter. When I am away, in the big house I turn down the thermostat to 50°F, which the oil-fired boiler maintains. The guesthouse is not heated when guests are not using it and goes below freezing often. The outside pavilion wood boiler room would go below freezing at times also. What this means is I have to add antifreeze to my heating system at a cost of $10/gallon. The gasification wood boiler system requires a minimum 200-gallon storage tank, that is a lot of antifreeze. The EPA approved boiler just started to look like too much money overall. If I was younger, had a family and lived in my mountain home full time, it would make sense, but as a part timer, it didn’t work for me. I didn’t feel good about it but I pushed ahead with my long-term goal of an auxiliary heat source- an outdoor wood boiler. I had gone too far down this road to quit on my idea.

Atomos DC15GS Wood Boiler is based on the principle of generator gasification using a special nozzle and exhaust fan.  The wood fuel is burned in a ceramic combustion chamber with side inlets of preheated primary air with an efficiency of over 90%.

One more point in regard to the EPA approved gasification wood boilers. From what I have observed across New York State, most people who have outdoor wood boilers are not overly well-to-do people with a lot of money to spare. OWB owners are mostly people of moderate income and use these wood boilers because they can save a lot of money during the heating season. It’s one thing to come up with four to five thousand dollars for a wood boiler and another thing to come up with $12,000 and up for a gasification system. The entry point just seemed too high. The use of OWBs are going to go in decline from what I can see. Maybe that is a good thing for the environment.

There is no complete manual for how to install a wood boiler, so as usual for me, figuring out the best way to do it was an adventure. I started installing the Biasi at the beginning of November 2017.

The Biasi Wood Boiler arrived strapped to a pallet like this. In the background is a cement pedestal I poured to raise it off the floor for easier loading. Weighing over 400lbs. I used my backhoe to place it in position. The doorway wall had not been built yet to allow it’s placement on the pedestal.

The Biasi Wood Boiler installed. A few things were not finalized but I had waited long enough and need to try it out.

A couple of issues stalled me along the way and I worked on it on and off until the middle of February when I was able to commission it. The frustrating thing about the timing was December and January were very cold with many days below 0°F, after that, not so cold. The day I started the wood boiler it was 20° outside during the day, going down to 5° at night. From my many years of using an indoor woodstove, I knew how to build a good fire that would burn clean. With that background, the smoky-polluting, fire issue wasn’t something that worried me, especially with the Biasi. The two things I was interested in were, how much nicely split dry wood I could pack into the firebox and how long that would heat the house before I needed to refill it. I got a good fire going and watched the temperature gauge on the boiler start to rise. Since this was my first time using the boiler, for safety reasons, I manually started the wood boiler loop pump when the temperature of the water reached 100°F, instead of letting the aquastat turn it on at 150°. Then I ran to the house and down into the basement to confirm that the pump had started and hot water was moving through the system. I then turned the house thermostat up to 72°F, creating demand for the hot water to circulate through the house.

Outside, on the way back to the wood boiler I saw some pretty nasty looking dark smoke coming from the chimney. I opened the firebox door and the fire was raging pretty good with flames lapping up through the whole stack of wood. I closed the door and kept an eye on the boiler water temperature. The Biasi is an air-damper, temperature controlled wood boiler and does not have a house thermostat controlled fan blower. It was designed to burn or cook continuously at 180°F. As the temperature went up the damper started to close. When it reached 170°F the damper had almost closed, meaning the air supply had been cut way back, causing the fire to slow down and preventing the water from going past 180°F. Lack of oxygen is what causes dark smoke. I went outside and looked at the chimney, the smoke wasn’t as dark, it was gray and there was a lot of it.

Capturing an image of smoke is not so easy but this is sort of what it looked like.

The heavy smoke concerned me but I thought I should give it half an hour or so to see if the fire would clean itself up. Back inside the house the system was working as planned and the temperature was going up. Back outside was a different story; the dirty, gray, smoke wasn’t clearing up. This put a real damper on my sprits thinking of all the pollution. The smoke wasn’t going towards the house, as the prevailing winds were sweeping it away. Nor could I see it from inside the house as the pavilion blocked it from view. But I knew it was still there and so did God. This was supposed to be a momentous occasion- the culmination of a 16-year vision put into reality. I ended up with just what I vowed not to; a smoking shit show- Bummer!

The wood boiler is not supposed to go past 200°F and has a maximum limit of 240°. I went inside the house, cranked the thermostat up to 76°, causing full demand on the heating system and causing constant circulation of cooler water back to the boiler. The wood boiler temperature was now at 180°F. I opened the lower firebox cleanout door, allowing more air to flow through the fire. I was letting in more oxygen, trying to get the fire to burn cleaner: more oxygen equals cleaner burn.

The Biasi Wood Boiler damper door wide open and the clean out door cracked open a few inches temporarily for an air draft burn boost.

When the Biasi Wood Boiler reaches about 175 degrees the damper is closed down.

When the water temperature started to reach 200°F I closed the lower door. The air damper was more or less closed at this point, as designed, choking off the air supply, so the boiler didn’t over-fire. The pop-off valve started to piss a little antifreeze- not much, maybe 1/8th of a cup total.   I checked the smoke coming out of the chimney and it had turned white but there was still quite a lot of it.

A few hours later, the house had heating up nicely, the smoke had minimized and I added some more wood to the firebox but not filling it up this time. Because I added more fuel to the fire, dark smoke again started to poor out of the chimney and lasted for about 30 minutes. While I was happy with how the house had heated up, I was very unhappy to the point of being depressed with the way the Biasi had performed. A belching polluter of a wood boiler was not my idea of an alternative heat source. So much for my long range plans.

The next day it was about 27° outside and while I thought it might not be cold enough for the boiler to perform properly, I decided to give it another shot. The same thing happed as last time with all the dark smoke coming out the chimney for a while and then it turned gray and eventually white. Several hours later, when I went to refuel the boiler, I opened the firebox door and something startled me; inside the cast-iron walls were glistening wet. I thought WTF is going on? Is the boiler leaking antifreeze somewhere and dripping all over the inside walls? I looked around the outside, couldn’t see any liquid on the floor and the pressure gauge was normal, so I reached my gloved hand into the firebox and touched the cast-iron wall. It was a little sticky but not wet. It was creosote.

Creosote formation on the walls of the newly installed wood boiler.

Creosote forms when there isn’t enough heat or oxygen for complete combustion of the wood gases. Usually it is a problem in the chimney but not so much inside the firebox, at least in a wood stove from my experience. I had a smoke pipe temperature gauge on the bare metal chimney pipe before it became insulated. The thing didn’t register any temperature. The gauge starts at about 175° and goes up to like 800°. I could even touch the non-insulated chimney pipe briefly and not get burned, something you could never do with a good fire in a wood stove.

This confirmed my suspicion as to what the problem was. The firebox was not getting hot enough for good clean combustion. That is what was causing the creosote and dirty, dark smoke. Green or wet wood can causes creosote but I knew my wood was well dried. These wood boilers don’t work like a wood stove in that they have a water jacket surrounding the fire that constantly cools the situation down. The cast iron surrounding wood stoves fires just keeps getting hotter till the wood starts to burn down.

This is another example of how Wood Boilers can pollute. To be fair, I do not know if the owner had just loaded the firebox or this was mid- burn but I did not want it. Think if you lived next to this situation.

With low spirits I went back to the city at the end of the next day and didn’t bother trying to burn the wood boiler again. This gave me some time to think about my depressing pollution problem and what I could do about it. While there I decided to take a closer look at the Biasi manual. The part about starting a fire I never really paid close attention to because I thought I knew all there was to know about burning wood. In it they recommended using well dried, split wood no bigger than 3 or 4 inches thick. That part I had under control but then they went on about creosote issues. The manual said to reduce creosote; it was best to stack your wood inside the firebox by mixing in some small splits of wood and or dry scrap wood with each layer to help the fire burn more completely. Okay I thought, makes sense on your first fill up but after that, when you refuel a burning hot fire, I didn’t think it should be necessary. Bottom line, if that is what I need to do to make this thing burn clean, that is what I will do it.

The other thing I figured was that the boiler was too powerful for the demand. The Biasi was rated at 120BTU’s. The big house demand was rated at 60BTU’s on the coldest day of the year or -20°F. It wasn’t nearly that cold on the day I commissioned it. The big house also has radiant floor heat with a design temperature not to exceed 98 degrees. So all that hot water coming into the house doesn’t have any place to go but back to the wood boiler. The guesthouse was rated at 40BTU’s but I hadn’t hooked that up yet. The combination of the two houses’ and the heat loss from the underground piping should bring the heating demand up closer to the 120BTU hour rating of the Biasi. When that finally happens, I’m sure the wood boiler would be operating at its peak efficiency and create the least amount of pollution. What do I do in the meantime?

After thinking about all this I came up with a strategy to test my theory. When I get back to the house, inside it should be 50° F, where the thermostat was set at. That means all 35 gallons of antifreeze in the house piping would be 50°F. The temperature of the wood boiler and its 15 gallons of fluid would be close to freezing. Under these conditions, it should take a few hours for the house to heat up, creating lots of demand from the wood boiler because of all that cold water circulating from the cold house. The cold return water will force the damper to remain open wider as it wants to reach 180°F, more oxygen will be getting to the fire, the fire will be burning hotter and thus cleaner smoke. Makes sense to me.

When I got back to the cold mountain house I stacked the wood according to the Biasi manual, mixing in small splits throughout the layers. I got the fire going and after about 15 minutes the boiler reached 150°F. I went outside and a fair amount of gray smoke from the chimney pipe was billowing around but not nearly as dirty as the last time. After about 30 minutes the smoke had cleared up to a tolerable white trail. I opened the firebox; the stack had burned down by a good 1/3 because of all the small stuff mixed in. I topped it off with a mixture of big and small firewood, the best I could with a good fire going. Gray smoke started to billow again for about 10 minuets but then slowly went to a nice trail of white smoke.

After while the smoke reduced to something like this.

Originally, my best-case performance vision of the Biasi, 3-pass system, wood boiler was no visible smoke coming from the chimney after about ½ hour of a good fire burning. Under my current demand situation, I found out that the no visible smoke condition would only happen after the wood fuel had burned way down, with only a few inches of glowing coals left and it was time to refuel. As soon as you refuel, dirty smoke will start to billow out for a while and if the heat demand is adequate, the smoke will eventually turn to a tolerable white trail. If the demand wasn’t high enough and the damper was forced to remain closed because the water temperature was at 180°F, dark gray-to-gray smoke will continue to billow for a long time.

What I learned from all this was that getting a healthy fire going in a wood boiler is not nearly as easy as a wood stove. The secret to any clean fire is starting it out hot, big and fast, letting in lots of oxygen at first. This drives out any moisture, gets all the wood to reach the critical temperature where it starts to turn into a burning char and the escaping gases combust before they hit the chimney. That is when you get a clean burn.

This is a log burning in my EPA approved wood stove. The critical temperature has been reached because lots of oxygen is coming in and there is no visible smoke coming from the chimney.
In an EPA approved wood stove you can not damper down the air intake, air is constant and abundant.

After the critical wood stack temperature is reached, you can begin to close down the air damper without causing a dirty smoke condition. My problem was the wood boiler water temperature was reaching its high limit too fast, closing down the damper before the firewood reached the critical temperature, starving the fire of oxygen too soon and causing a large amount of dirty smoke.

I was pleased with the fact that I could get the Biasi to burn at a tolerable pollution level but that was with a cold house of 50°F when I first arrive. What am I going to do for the rest of this winter? How could I continue to use the wood boiler on a daily basis with the Guesthouse not being hooked in yet?

At night, I turn down the house thermostat to 62°F and when I get up, that’s what the water temperature is throughout the system. I was wondering if using the Biasi- recommend wood stacking pattern, could I get a clean fire burning from a cool house, with a return water temperature of 62°F? Could I get the critical burn temperature required in the firebox for the wood to burn clean before the damper shut down the air supply?

In the morning, the outside air temperature was about 25°F. The pavilion boiler room had cooled down to around 40°F. I stacked the wood as recommended by the Biasi manual and lit the fire. After the fire got going and the pump started to circulate hot water, I went into the house and set the house thermostat to 72°F. To my relief, by the time the wood boiler reached 180°F, the smoke had turned white and in about a half hour, it became a small trail. Boy was I happy, whew!

After the house had warmed up, I didn’t have any hope that I could refuel the wood boiler under these conditions without causing massive air pollution but I thought to try something. After a couple of hours the fire had burned down by 2/3rds and I opened up the lower door, getting plenty of oxygen going through the firebox. Then I opened the firebox door and threw in some small stuff mixed with about 4 big chunks of wood and closed the door leaving the lower door open. Once the flames started lapping around good I closed the lower door and ran down to the basement. In the basement I had rigged the oil-fired boiler pump so I could manually turn it on. The water in that boiler was still at about 62°F. Turning on the pump forced the cool water to mix in with all the warm and allowed the damper to stay open long enough to get a white smoke burn. If I wanted to get the wood boiler to burn even cleaner at this point, I had to let more oxygen in through the lower door and then close it when the water started to reach 200°F. This process worked and allowed me to get a few more hours of heat from the wood boiler, at a lower pollution level. If I didn’t do this after refueling, lots of dirty gray smoke would just billow out for a long time. While this technique was successful, think of all the monkey business involved, it was not a long-term solution.

This brings me to my next big idea. In December I had called into the Biasi technical support line and asked the very helpful representative why were there two aquastats included with the boiler package? He said one was for the boiler pump and one was for the overheat dump zone. I said, “Overheat dump zone? I don’t have a overheat dump zone.” He said, “Don’t you have an unused radiator zone or something, where you can send excess heat if the boiler starts to overheat?” He went on to explain the second aquastat was supposed to be set at 195°F and was designed to activate an overheat dump zone pump for the excess heat to circulate through, thereby cooling down the boiler back to its normal operating temperature of 180°F. I said, “No, I didn’t have one of those designed into my system.” He didn’t make a big deal out of it but I could tell he seemed to think it was important overall and it was kind left hanging in the air with silence. I knew the next year the guesthouse would be hooked up and I could use that for a overheat dump zone but for now, no, I didn’t have one.

So my big idea is this; when I need to refuel the boiler and it is already running at 180°F, I have the second aquastat set at 185° and hooked up to the  guesthouse heat zone pump. When the pump turns on, it causes cold water to circulate in, thereby letting the air damper stay open longer and get a reasonably clean burn. When the boiler water drops below 180° the pump to the guest house shuts off. By that time the newly added wood will have reached it’s critical clean burn temperature and the smoke should be hardly noticeable.  Not a hassle at all.

It makes me think of way back when Charlie first said to me, “You don’t want one of those wood boilers you fill and forget do you?”  What else am I going to do? Sit on my ass inside the house and watch reruns of Mork and Mindi all day?

Seriously though, at this point, I feel comfortable about the pollution level aspects my wood boiler. It isn’t what I had hoped for but I think it will only get better after I get the whole system operational. During very cold weather it will be fine, I just think overall I have to be mindful of what is going on. It will never be a “fill and forget” situation but I never expected that to begin with. In the future, I also hope to install enough solar panels to power my house and maybe that will offset my carbon deficit to neutral.

If you open up the fire box door and see this, you won’t be seeing any smoke coming from the chimney. The wood has reached its critical burn temperature and reduced to a burning char. Now, if I can only get this to happen on a regular basis I will be happy and so will the atmosphere.


06
Mar 18

Installing solid hardwood flooring over radiant floor heat.

Can you install solid hardwood flooring over radiant floor heat? That was the pressing question after I had installed radiant floor heat in the new living room using the “DryAbove” method by HeatLink. Briefly, over floor joists or rigid foam on concrete, the DryAbove method entails laying down one layer of ¾” plywood and then in the opposite direction install 6-3/4” sleeper strips of ¾” plywood on 8” centers. This will leave a gap of 1-1/4” for the PEX tubing and metal heat transfer plates. After doing this to your floor, you look at it… and wonder, what in the heck am I going to put over it?

Obviously you should have an idea of what you’re going to do before starting the DryAbove method. Like so many things before, in my home building dream, I sort of had an idea. From what I had read, the best way to go was with laminated manufactured flooring. The floating install kind. Lay it down and let it move with the heating season. I knew I could do that for sure but what I really wanted to do was install ¾” solid hardwood flooring… but I was afraid. I was afraid of pounding all those nails and fearing one would go through the PEX tubing by mistake. The horror! For me, that was where the controversy lay and what, at times, kept me awake at night. (I was not concerned about whether the heat coming from below would affect the flooring because I had seen a YouTube video with a team of guys who power-nailed down solid hardwood oak over radiant tubing, so I knew my dream was possible).

But spring had sprung and there were more pressing issues outside in my home building quest, so I had time to think about it. I just bought some 4×8’ x ½” plywood and temporarily covered the radiant heat tubing with that so I could walk on the floor. The plywood came to good use later.

In the meantime, on the Internet, I looked at the installation guidelines from a couple of manufactures of solid wood and laminated flooring. When it came to radiant floor heat, the laminated guys were cool with it for floated installation but most solid wood manufactures were not thrilled. The hardwood people said it could be done with precautions. Precautions like the water temperature under the wood floor should never go above 88°F, (some say lower), and never below 60°F. I thought that’s fine, because the mixing controls for the radiant heat water temperature was not supposed to go over 88°F anyway. The below 60°F part was a different matter because this is a second home and I lower the thermostat to 50°F during the times I wasn’t there in winter. I was talking to my sawmill friend Bandsaw Bob, who had put down laminated wood flooring in his dinning room and living room and said he wished he hadn’t. He said he didn’t like the sound it made when walking on it. He said it sounded plastic. The kind I put down in my city apartment didn’t sound like that but it was real cherry laminated on top of 3/8” plywood, soft and very easy to dent. It also moved sometimes and I didn’t like that. People loved the look of it and Deb’s yoga clients thought it was perfect because with the underlayment pad, it had some give. But that is not what I wanted in my “authentic” country home in the mountains.

From the time I left the flooring project, till I picked it back up, three years had passed. When I got serious again, the big issue for me was no longer, “Can I put solid hardwood flooring over radiant heat?” but, rather, “Which product do I like better?”  After a yearlong quest of going back and forth between laminate and hardwood, I went with hardwood. From Home Depot I special ordered, Blue Ridge, Oak Driftwood Brushed, 5”x3/4”, solid wood flooring at $4.99/sq. ft.

3/4″ Oak has an R value of 0.64. So it is a good material for radiant floor heat transfer compared to others. I liked the novel look of 5-inch wide planks and figured there would be less nails pounded and less chance to put one through the PEX. I wanted to do the installation at the end of the winter heating season so the house was good and dry. That way the floor would be as tight as possible.

I let the flooring acclimate in the living room for over a month. When I opened a box and pulled out the data sheet I was hit with a nasty surprise, the manufacture did not recommend putting it down over radiant floor heat. Why didn’t I check that out before? I did but it was three years previous and not with Blue Ridge. The main problem was the boards were wide and not the narrow strip kind. On the Internet the manufacturer went deeper into why you shouldn’t install it over radiant floor heat and it wasn’t good. All hell could break loose by their description, splitting, cracking, and boards popping, all kinds of destructive things. I had like 16 cases of this stuff in my living room for over a month, $1,600 worth. My wife and I both loved the look. I wasn’t taking it back.

You know when lawyers get involved sometimes a small problem becomes a big one. It was about a risk. I’m sure the lawyers told the manufacture to stay away from it for liability reasons. That is what I figured the situation was here. I have installed oak hardwood, narrow strip flooring before, in the guesthouse, over rigid foam insulated concrete on sleepers. The house would freeze to as cold as 20°F when I wasn’t there. Then I would come back in the winter and blast the wood stove, heating the room up to 70° in less than 5 hours. That flooring is fine after 15 years. Upstairs in the main house, I installed over 200 sq. ft. of wide plank, 9”x 7/8”, solid maple flooring that I had harvested from the property and milled myself. The house would freeze when I wasn’t there, I would show up, blast the place with a woodstove furnace, do this over many years and that wide plank maple is as good today as it was when I installed it.

9 inch Wide Plank, Hardwood Maple being installed in the 2nd floor bedroom. The maple was harvested from the property, sliced up by BandSaw Bob, planed and kiln dried by me. A detailed description of this is explained in another post.

So I’m thinking how bad could this radiant heat be? The go ahead clincher for me was the fact that I would be nailing this flooring onto what was essentially a floating plywood floor. Floating over 3-inches of rigid foam insulation on concrete. So I figure the whole thing will move together if there is any expansion stress from the warming. The other thing is that radiant heat is slow. When you go from 50°F to 70°F it takes hours. So any expansion was going to be slow as well. Manufacturers are also concerned about the moisture content of the wood and adding heat from below affects that. If one side is dryer than the other cupping or splitting can occur. All I can say about that is I use my EPA approved wood stove in winter when the house has cooled down significantly to bring it back up to 68°F and save on oil. Sometimes I use it for a burst of warmth or atmosphere. This dries the house out so any heat from below is only going to equalize what is going on above from a moisture content perspective. I wasn’t stopping now- to hell with damn lawyers and maybe common sense.

What ever flooring you choose it needs to be installed perpendicular to the predominate PEX run.

Getting started is the hardest part. In my case the supply lines were running parallel with the flooring. The first course could not be nailed down because of the PEX so I used flooring adhesive. I didn’t want to add a transition saddle so I ripped the bottom tongue off with a table saw. This gave me just enough space to overlap the tile.
The top tongue was sanded down to make a smooth bevel. This transition wasn’t an accident, I planned for it. As of this writing it has been over a year and the glued down transition plank has not moved. Long term, if there is ever a problem here, I would countersink four square drive, stainless steel screws, evenly spaced down the middle of the starter strip. This photo documentation will remind me where the PEX is.

Installing hardwood over radiant floor heat.

2 1/4″  7D flooring nails.
Love my Estwing 16 oz. hammer.

I decided to hand-nail this job so I could stay focused on the PEX. Pilot holes were drilled for each nail and then counter sunk.
It would be hard to make money doing it this way.

I ripped a couple of angled wedges to persuade any errant boards tight.
I had very few reject boards and was extremely satisfied with the Blue Ridge product. Good variety of lengths in each box to make a nice random look.

One thing I made sure was that there was plenty of expansion space around the perimeter because of the radiant floor heat controversy. That includes the plywood sub-floor perimeter spacing also.

Finished floor. I was very happy with the way the transition worked out between the kitchen tile and the living room floor.

I still need to mill some hardwood cherry for the baseboards and window moldings.
It will happen!!!

Epilogue: Because of the fact that this is a second home and the temperature fluctuates so much from when I am at the country house and away, I do take precautions in regard to the solid hardwood flooring when heating the cold house up. First thing I do upon arriving is start the wood stove. That is in the kitchen area and surrounded by ceramic tile and a masonry wall.

EPA approved US Stove King 89,000 BTU with blower, from Home Depot.

I let the heat build up for a couple hours, more or less, depending on the outside temperature. In the living room, where the thermostat is, the temperature will start to rise becasue I have a duct-work blower system that circulates hot wood stove air, through there, the bedroom and the kitchen intake area. Most often the thermostat was set to 50°F while away to save on oil. When it starts to get around 58°F I change the thermostat to 60°F, causing the oil fired boiler to fire and start circulating warmer water through the floors. Basically it starts chasing the wood stove so they work together till the room temperature reaches 68°F, or whatever I want. This way I think it eases the stress on the flooring. So far it has worked. The floor is fine. I will update this epilogue in years to come. I am not worried.
No one ever said having a second home was easy.


06
May 17

The 2016 Story

In January of 2016 I sent this to my clients to let them know I was ready to go back in action. Some bought it, some didn’t.

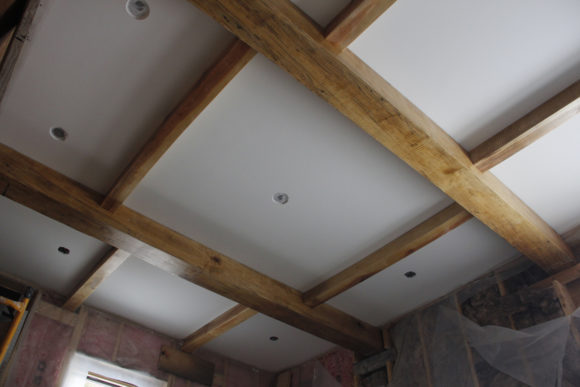
Within 6 weeks after my hip replacement surgery I was back at work on the new bedroom. I took it sort of easy for the most part. There are restrictions after total hip replacement surgery, (posterior type), the most critical being not bending at the waist more than 90° or carrying heavy weight. Keeping that in mind, the first order of business was to run the electric rough-in and then insulate the ceiling to R50. To install the insulation, I had to stand on a rolling, 4’ scaffolding. I just needed to be careful getting up and down but, while up there, I was held in place by the ceiling joist–so it went pretty well except it was cold as hell with no heat yet. I hadn’t knocked a doorway into the heated house because I wanted the room insulated first. Putting up the 5/8 sheetrock on the ceiling by myself was challenging but I just took it slow and got it done. I cut the bedroom doorway into the house by the end of February and completed all the sheetrocking, spackling and priming by beginning of April.

Two layers of insulation were used. 16″- R19 faced insulation between the 2×6″ ceiling joists and 24″- R30, unfaced, installed perpendicular to that and over the joists.

The doorway to the heated house knocked out and the rolling scaffolding I use. The pipe on the top right is duct-work circulating hot air from the wood stove in the kitchen.


I used a Rockwell, SoniCrafter tool to cut these pockets for the 4×4″ beams.

Last fall the beams were hung 12″ below the joists, then sanded and varnished. The the insulation and sheetrock was installed after that. Then the ceiling was completely sanded and painted. The beams were then fitted together and jacked up as a unit to there final position, (jacked up by my shoulder standing on a ladder). This was a big job but in the end I think a better result was achieved than having the beams in position from the start. A cleaner look.

8×8″ and 4×4″ hard-maple beams.

Throughout all this, my hips worked pretty well. I didn’t have any problems until I went outside and tackled a big project that needed to get done by mid- spring.

Ferns needed to be transplanted around the new bedroom, but before the ferns could be transplanted I needed to dig a trench through that location for my insulated heat pipe that was running from the house to the outdoor wood boiler.

I thought this would be a fairly easy job until I excavated along the bedroom foundation. Two years earlier I had buried a large culvert pipe that ran from inside the basement wall, under the cement slab dining area, to a point parallel to the outside of the new bedroom foundation. This buried pipe was intended as the conduit for the insulated heat pipe going to my outdoor wood boiler. Problem was, unbeknownst to me, when I poured the bedroom foundation wall, the pressure of the wet cement had pushed out the footer portion and partially covered the end of this pipe. So I had to spend half a day with a hammer drill, chipping away at this concrete.

On the left is the view of the old culvert from inside the basement. The middle photo is of the other end and you can see the concrete I had to chip away. The right photo is a view from the basement of the new 10″ plastic pipe connection. It was flexible enough to make the bend no problem thankfully. The big pipe is sloped away from the basement, drain pipe and stone are below the connection on the right for any groundwater to escape.

Once I got the concrete out of the way, I had to first put down a 4” perforated drainpipe and cover that with clean #2 stone. Then a 20-foot long, 10” plastic culvert had to go down in the trench, connecting to the end of the pipe, which I had just cleared of the hard concrete. I back-filled around that and then finally I ran three 1”, PVC conduit pipes on top of the culvert. These were for electric power and controls for the outdoor wood boiler. Then the trench was backfilled and I could finally start to plant the ferns over this area. All that took 2 full days. The whole job turned out to be more strenuous than I thought it would.   Whew!

The 10 inch, plastic, corrugated culvert ended here for now so I could get the ferns transplanted over the area. Continued with this job in August.

This is roof rainwater collection piping. Landscape fabric was place over the stone and ferns were planted on both sides.
With metal roofing, eves tend to get ripped off in winter from large snow slides, so I deal with the water run off this way.

I felt fine when we left that weekend to go back to the city but, while working at my TV camera job and walking around the city, my hips started to cry out in pain. Both hips- the replacement hip and the old, original hip. To make matters worse, I had to do a couple days of shooting with a very heavy camera while walking around.

The next weekend I went back to the country and transplanted all the ferns- it had to get done now or wait ‘til next year, hip pain or not. Now it was. This wasn’t too painful and I thought maybe I was OK. So I go back to the city and the pain gets as bad as it was before the operation- in both hips. Every step I took had painful consequences. I couldn’t see how I was going to work as a cameraman let alone finish my house. Social Security Disability was the way I was heading at this rate. SSD is not easy to get and for the most part you can’t be able to work or at least not make more than $1K/mo for 6 months. In my research I found that you need documentation to back up your case. So I went to see my PCP and gave him all the details. Dr. Mele, who knew about most of my issues was on board and helpful. When I went to see my hip surgeon, Dr. Ranawatt, he told me I had 6-monthitis. It happens to everyone except in my case it happened at 5 months. I told him I couldn’t see going on with my career in this pain and that I needed to document this for SSD. He said that wouldn’t be a problem. I said I wanted to wait on replacing the right hip for a year in order to know what to expect recovery-wise from the replacement hip. I am not going to go ahead with replacing the right hip if the left feels as bad as it does, (pain in the thigh not the joint area). I told Dr. Ranawatt I thought the pain was from carrying around 50 lbs of camera equipment and it was unrealistic at my age to think I could continue with this kind of work. He halfheartedly agreed. Hip Surgeons want successes not failures. I told him I was going to have to start taking pain meds at work if things didn’t get better. On the way out he gave me a script for Tramadol for pain and Diclofenac/Misoprostol, a Non-steroidal anti-inflammatory drug with a buffer for people with GERD. I then asked Dr. Ranawat if it was OK to ride the stationary exercise bike? He said, “I would try to take it easy for awhile.”

After filling the script I took one tablet of the Diclofenac. Within an hour I walked outside and I noticed immediate improvement. In the morning we drove upstate and I was able to walk around the property pretty much pain free. The next day I gave the body a big workout transplanting the rest of the ferns and had no problem. What is this stuff? I can’t believe it- my life outlook totally changed. I can look forward to the future again with a positive outlook. I never had to take the pain meds.

The photo on the left shows where the ferns grew wild outback in the meadow. On the right is the transplant. Dirt was placed over the seams to help it all grow together. I couldn’t do things like this without my Backhoe. Because of the fern root system they are pretty easy to dig out in slices, 3-4″ deep  by about 2′ wide, 3-4′ feet long and they remain intact.

This photo was taken early in the summer. Ferns really like this mountain.


Bizarre story: One day in late Spring I was placing a big slab of a rock, 4’x3’x5″ thick in front of the new entryway. I was using the back hoe to hold the rock up enough so I could use a shovel and move some dirt out from underneath and let it sit better. I couldn’t get this small, 6″ rock to move out of the way so I reached in to grab it with my bare hand. It moved but so did the whole boulder, crushing my hand between the two. I was pinned there and could not get enough leverage to raise the boulder. The pain was too great to bear and I was trapped so I just pulled my hand out  ripping a deep gash in the skin. I walked around in pain cursing myself for 10 minutes. This picture was taken after I had washed it off with hydrogen peroxide. Getting beneath the skin flap was no fun. Took awhile to heal but OK now.

With the ferns taken care of, I could go back to working on the bedroom. I didn’t plan on finishing the job until the fall but I was so excited about its development that I plowed ahead. I got the hardwood maple window jambs in, everything primed and painted, the laminated cork flooring put down, closet doors in, king bed platform built and installed. The room was ready for sleepers- but that didn’t happen till late fall.

May- Click-lock, cork flooring was used to cover the bedroom radiant heat cement slab. Easiest floor I ever put down- nice and tight. Feels good underfoot. Very happy with it. 
https://www.homedepot.com/p/Heritage-Mill-Cobblestone-Plank-13-32-in-Thick-x-5-1-2-in-Wide-x-36-in-Length-Cork-Flooring-10-92-sq-ft-case-PF9656/2047

Of course after the bedroom was finished Deb was like- “Now finish the floor in the kitchen.” She didn’t want me to go outside and start the pavilion until the kitchen was taken care of. I was hesitant to start the pavilion anyways because I was worried my other hip would give out and I would have to get that replaced at any time. If things got bad and I had to stop working at least most of the kitchen would be completed and we could start to use it.

We picking out the tiles was a yearlong journey. In the end Lowe’s Home Improvement had what we were looking for, “Aspen Sunset,” porcelain tiles in a combination of 12×12” and 6×6”. The tiles were to be laid on a diagonal, with a pinwheel design. This would be the biggest tile job I had ever done at 300 square feet, consisting of three offsetting rectangles. These rectangles included the kitchen, dinning area and a short hallway.

Bosch GTL 2- Laser Level and Square, $38

I was more than a little concerned about this tile job. The issue was the pinwheel design, a 12 x 12” tile, surrounded by four, 6 x 6” tiles on each corner. This design made it difficult to keep everything going in a straight line because offsetting tiles interrupted the lines. Also, I wanted to change layout directions so I wouldn’t back myself into a corner. Luckily I stumbled across this advertisement for an inexpensive Bosh laser square. It was for floors and walls and shot out two laser beams at right angles. I was worried that after changing directions and then eventually meeting up with the old layout my grout lines would not line up. Or worse, that the tiles wouldn’t fit and would need to be cut down- a disaster.

This Bosh laser saved my butt. Only in two, far corners did I have to fudge the size of the grout lines a little and you would never see this unless you were looking very closely. The reason I had to fudge these tiles was not becasue my layout had strayed but because I inadvertently bought a different production batch of tiles and they were about 2 millimeters bigger. I saved these for the corners. Something to be aware of for a large tile job. In hindsight, the only thing I regret is I took a little too much grout out of some of the joints as I wiped away the excess. No one else noticed or cared.

Wide view of the kithchen tiles. The center island was removed for this. The tiles took 5 days to lay and two days to grout. Well worth the effort to go diagonal, pine-wheel layout.

John, I hear you asking, why do you make things so difficult to begin with? Why lay tiles on a diagonal or use two different sizes of tile in a pinwheel layout? The answer is in the results- doing something pedestrian verses doing something special. I don’t have any kids, but this dream, “Wildcat Dreams,” is the creation that will outlive me.

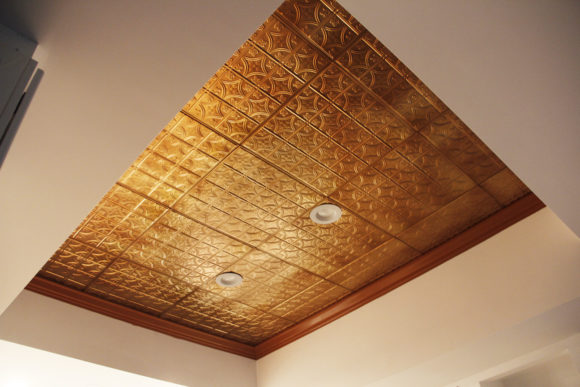
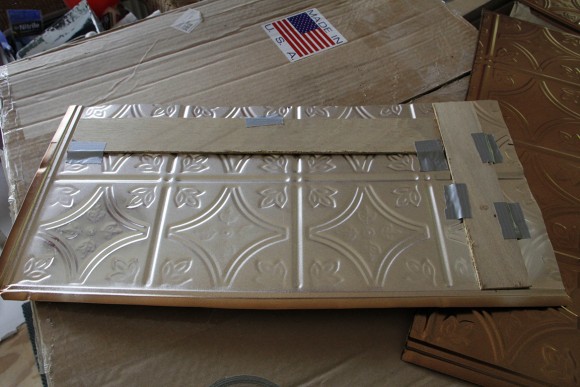
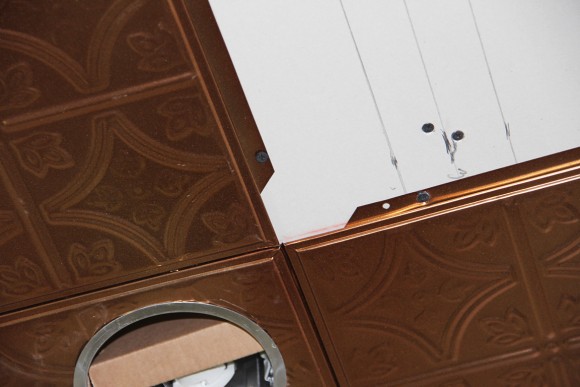
A kitchen tin ceiling was installed back in 2015 but the a cove molding surround was added in July of 2016 to complete the look.                                                                                                                                              Product purchased from American Tin Ceiling in Florida.


If you have every installed cove molding you know it’s no cake walk. I do not have an expensive chop saw to make perfect compound miter cuts so I make them by hand. I find MDF board is the nicest to work with becasue you can make easy fine cut adjustments with a coping saw or utility knife. If you have a high ceiling wood putty can hide a lot of sin. Also, MDF board is more dimensionally stable than real wood so your joints won’t separate with the seasons.

Cove molding joint with wood putty and paint. MDF molding.

With the kitchen tiles down, the island cabinets and counter could be put back in place permanently. We could have moved in at this point, but didn’t because it was getting warm again and we still loved our old little place. To tell you the truth, I wasn’t ready to move across the street to the new place- it didn’t feel like home.

Oddly things changed one day in July when I was scratching my back. Something was stuck to me and I pulled it off. It was a big engorged tick!

This tick from my back must of been ready to move on because it came off easily when I scratched my back. Note the tiny piece of skin in it’s pincers. Strange lime green color but if you look on the internet this is what a blood engorged tick looks like.

I had never seen an engorged tick before. I looked at my back in the mirror and I had a big bulls-eye there. This freaked me out. I saved the tick, taking it to the Doctor later in the week. He looked up pictures on the Internet and we both agreed it looked like a deer tick. So he put me on a 14-day course of antibiotics but he also sent the tick to the lab for testing. The next day the Doc called my cell phone and told me to stop taking the antibiotics because it turned out to be a wood tick- they do not carry Lyme disease. The bull’s eye continued to weep for a few weeks, which didn’t reassure me, but I felt fine and now it is gone. Over the 19 years I have been working on developing my property I never once got a tick bite that I know of, nor have I seen that many. I have spent hours outside in the forest, meadows, springtime, summertime and fall. Deer and mice were all over the area but no tick problems. Believe you me; from now on I am going to pay attention.


So- back to why I eventually moved across the street to the new house. At night I tend to wake up to go to the bathroom and usually can’t go back to sleep so I read. Deb doesn’t like the light from my Kindle so I get up and lay on the bedroom floor carpet, reading till I am ready to fall back to sleep. The problem was I realized later that Deb would take her clothes and shoes off and drop them right where I lie down and read. These were the clothes she had worn out in the fields when she collected blueberries and whatnot (weeds that supposedly had healing purposes).   I was lying next to these clothes for two nights in a row till we went back to the city. I figured that is where the tick came from (maybe). So I told Deb- “Why didn’t you take off your dirty field clothes and leave them in the back room like I do my work clothes?” I told her I wasn’t going to sleep in that bedroom again till she vacuumed it all out, thoroughly cleaning it and washing all the bedding. Well she was not into taking orders from me, so that didn’t happen and I moved across the street at night, sleeping in the upstairs bedroom alone. After two nights of that she came over during the third night and silently climbed into bed with me. We smiled at each other in the dark.


We began to really appreciate the new place and even after Deb cleaned out the old bedroom we didn’t move back. That is how we came to get used to and enjoy our new world. Once the nights started to turn cold, though, we moved back to the old house, (we still cooked and ate there anyway). We had a wood stove in the little house that could easily take the chill off with a quick fire. It is a very cozy place.

Not very sophisticated architectural drawings but it was good enough for the Truss Maker.

Back to the building of my small town. After I spent seven days tiling and grouting the new kitchen floor I noticed some of my old spinal stenosis symptoms were coming back. Symptoms that for the most part had gone away with the sit-ups and leg marches I had been judiciously doing for the past couple of years. My stenosis symptoms were strange sensations in the tailbone, buttock region and much more frequent leg numbness. I had started swimming laps in a pool once a week and slacked off the PT a little. Thinking maybe that was the problem I religiously started back to doing the crunches and leg raises. In spite of this “come-back-to-haunt-me” issue I plowed ahead. Throughout August I worked on excavating the pavilion area, installing drainage pipe, stone, gravel and cementing in the 6×6” pressure treated post that would hold up the roof.

The machine that makes it all possible is my 1980 Case 580C. You can’t time your breakdowns and this big dipper cylinder blew it’s hydraulic packing just as I was digging up my driveway near the pavilion. This excavating made the driveway impassable. I had to shoot some hydraulic oil around for awhile till I could make it passable. Then I played mechanic for a day to remove and install it.  I took it to a guy nearby who is a heavy equipment mechanic and he replaced the packing at an unbelievably great price. Lucky for me.

Finally by the middle of summer I got the 1 1/4″ duel insulated heat pipe run. 70′ from Pavilion to basement.

4″ PVC and 2″ stone (stone in the bucket) surround the slab for good drainage. Drains to daylight.

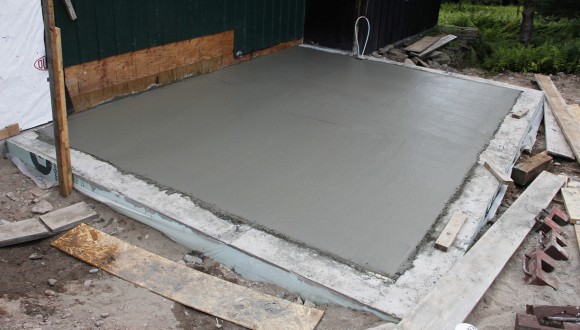
This was right before the pour. 1/2 rebar was installed at 16″ centers as well as extra bar around the perimeter and wire mat in strategic areas. 4ml plastic was used to control curing, The pour was done in three sections with 2×4″ screed guides in place.

By September 10th I was ready to pour the slab. The insulated heat pipe had been run to the basement, all the rebar and forms were in place, time to getter done! The night before the pour I started to have doubts: 7.5 yards of concrete, 352 square feet that need to be screeded off and floated, with 3 guys. My strength, back, and hip issues concerned me and I wondered if I would be able to step up and go big for the pour.

The cement truck showed up 20 minutes early and one of my two guys was missing. This driver was all business, no small talk just, “How do you want it- wet or dry?” I could tell he wasn’t too happy about seeing only two workers for a pour that big. With only two guys it would take longer to pour the cement, which meant the truck would go overtime and he would be late for his next delivery, backing the day up for everybody else- on a Saturday no less. I usually prefer a dry mix- not as much water- it’s stiffer and harder to work with but makes for stronger concrete after it cures. But this wasn’t a road I was building, just a parking area. I said, “Wet!” with a strong sense of relief and resignation. The driver jumped back in the truck to put more water to the mix, gunning the engine and making that big drum rotate like crazy, mixing in the extra water. Pronto he backed up the truck, didn’t ask if we were ready and just let ‘er rip.

It was 7:40 AM, Rich and I just stood there looking at the cement pouring out the shoot for a few seconds, watching the work accumulate before our eyes. Inertia had us stuck for a moment. Snapping out of it, I went to work with my shovel and Rich with the rake, pushing and pulling the mud around. Archie showed up, jumped into his rubber boots and pitched in to help. I was so glad we went with a wet mix because it made our work so much easier. When it came time to level off the cement with a screed, it was no harder than spreading soft butter over toast. HA! Rich didn’t even pop a bead on the first pass. The whole thing got poured in less that an hour so the driver didn’t charge any wait time and drove off lickity split.

September- the cement crew. Archie, Rich & John

After being paid Rich and Archie, my two helpers disappeared in a flash and I continued with floating the wet slab. Nice job!
Not being a professional concrete contractor, ahead of a pour, there is something anxiety inducing about knowing the finality of hard concrete and the things that could go wrong, that when it’s over, I get a strong sense of relief, satisfaction and optimism for the work ahead, because the hardest part is behind me. So much planning and work goes into the prep for the pour and for me- second guessing, so when it’s all over you just say- YES!

Eagle Acid Stain from Home Depot.

This is my review on HomeDepot.com:
I recently used Eagle Acid stain for concrete in olive color. The concrete slab is going to be used for an outdoor pavilion and was only floated a couple of times with a hand made wooden float. I never touched the cement after the float but when it got firm enough to walk on I sprayed it with water and covered the whole job with plastic. Leaving it covered for 7 days. I waited 28 days for the cement to cure before using the stain. . It took 1.3 gallons for 360 sq. ft.
First I misted water over the entire slab to make it damp. I used a garden style sprayer and went to work spraying the slab. As I went I would stop spraying and broom in the acid with a shop broom working it into the cement evenly. I highly recommend a damp slab to start and brooming the acid in as you go for even coverage. They recommend a sprayer for acid stain but mine was not and I think the brass tip and tube of the sprayer effects the stain somewhat if you stop and it sits- reacting to the brass. In hindsight I recommend using a plastic garden sprinkler watering can. Have a helper do this as you work the acid around with the broom.
The next day I rinsed the slab several times and broomed it with lots of water. Then I mixed 16 OZ. of ammonia with 5 gallons of water, flooding the area and brooming the neutralizer mix in. I did this twice then I rinsed the slab thoroughly again.
I waited a week to seal it and I used Behr Premium Low-Luster Sealer, $28. This produced the look I wanted and took the curse off the olive color. If you want a darker wet look- use the Behr Wet-Look Sealer. Eagle makes a good sealer which I have used in the past also. I was very pleased with the Eagle Acid stain and the Behr Premium Low-Luster Sealer.

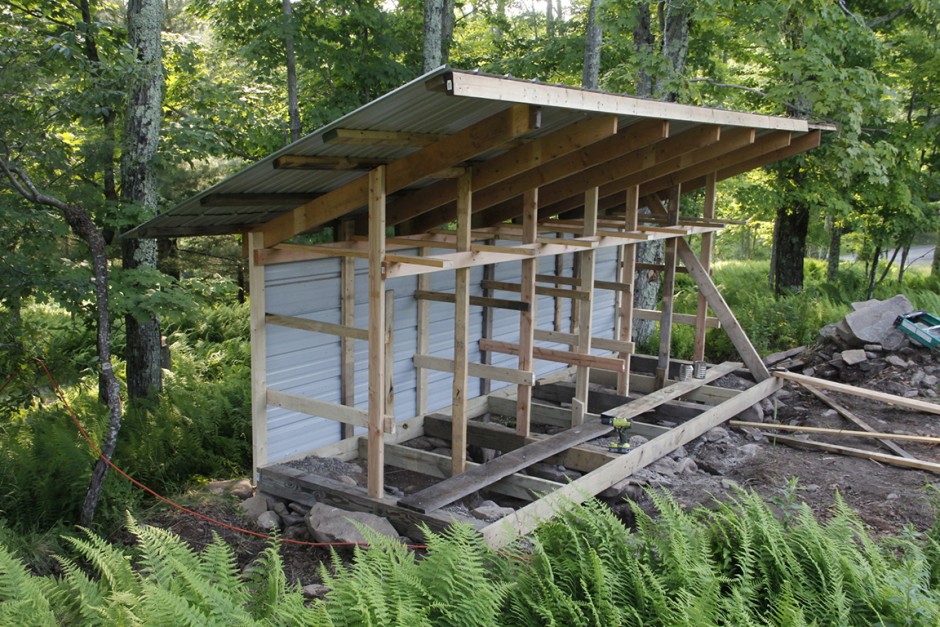
The Pavilion October 2016


04
Feb 17

Reviews

EPA approved US Stove King 89,000 BTU with blower, from Home Depot.

I bought an Englander wood stove from Home Depot 18 years ago and have been using it as the sole heat source for my 1000 sq. ft., zone 4, country house ever since. Recently I completed a new, 2000 sq. ft. house nearby and bought a new wood stove to use as an auxiliary heat source. The new stove is an EPA approved US Stove King 89,000 BTU with blower, from Home Depot. The new house has an oil fired boiler and radiant floor heat. EPA approved wood stoves are a different animal than the typical old style. You can’t load these full of wood, get them going good and then damper down the air intake. On these stoves you can’t adjust the air intake at all. Don’t get me wrong- I love this stove- it makes a beautiful fire to look at through the glass because of its “air wash system” and if you dim down the lights at night, yellow light flickers off your walls. It throws out a huge amount of heat if you get 3- 21” split log chunks going good. This is not a fill and forget it wood stove. For best results after the fire is going I put in one 18-21” split piece of 2 or 3 year old dried wood every hour and leave my home thermostat at 60 degrees. The downstairs stays at about 70 degrees with an outside temp of 30-40 degrees and the upstairs stays cooler at about 65. The boiler only comes on late at night after I have gone to bed or leave the house and the fire has died down. I have a big masonry wall and chimney behind the stove, which holds heat through the night. The stove sits on a cement radiant floor heat slab. I only use the internal wood stove blower when the house has been unoccupied and cold. It’s works fine and isn’t as noisy as the old one. After the room heats up I switch over to a 20” x 20” filtered air intake above the wood stove that feeds 6” duct-work and in-line fan. Air continuously cycles past the wood stove and is distributed to my downstairs living room and bedroom through this duct-work in my kitchen soffits. I also have a 4” outside air intake feed at the base of the stove for a fresh air source to fuel the fire. You don’t have to have a fancy air distribution system but I do recommend at least a ceiling fan nearby – otherwise it will get too hot near the stove. The stove has a nice size ash drawer that I find works really well. Big enough that you only have to empty it after 4 or 5 days of continuous use.

After your house has warmed up you need to be very cautious about overloading these types of EPA approved wood stoves. You can not shut them down unless you use water. I do not like the idea of a flue damper- nor have I ever used one and the manual say’s not too. Two negatives; the stove black paint pealed off a portion of the top when I first fired it up- must be the stove wasn’t completely clean when they painted it. The other negative is the door handle is very wonky compared to my old stove. It is too short and you have to engage it just right to latch. I have gotten use to it but at first I was burning my hand at times trying to close it. I think they made this handle intentionally wonky so you have to pay attention to how you close the door and don’t just slam it shut and maybe break the glass against a log. I do not burn my hand anymore and I get it. The steel is of a little lighter gauge than old style stoves. In final I want to say these new EPA approved wood stoves make for a healthier environment inside your home and out compared to old models. Add your seasoned dry wood thoughtfully to this stove and you will have a beautiful warm fire that will give you peace.


12
Sep 16

2016 Highlights

The new bedroom addition is completed and ferns were transplanted in April to surround it. The Pavilion is in the background right.

The Pavilion- work in progress that is out of money for now.

After the ceiling was sheet rocked and finished the 8x8" and 4x4" hard maple beams were raised into final position.

February- After the new bedroom ceiling was sheet rocked and finished the 8×8″ and 4×4″ hard maple beams were raised into final position.

April- Two closets were added for lost of storage.

April- Two closets were added for lots of storage.

April- The final window was installed and the hard maple custom jambs are being varnished.

April- The final Anderson window was installed and the maple custom jambs are being varnished to accommodate the 8″ thick walls. (All hardwood harvested from the property.)

Ferns were transplanted and surface drainage was installed around the new bedroom. The ferns were scooped up with my backhoe from the field out back. This needs to be done very early in the season to be successful. It was!

Ferns were transplanted and surface drainage was installed around the new bedroom. The ferns were scooped up with my backhoe from the field out back. This needs to be done very early in the season to be successful. It was!

View of transplanted ferns in September.

View of transplanted ferns in September.

May- Click-lock, cork flooring was used to cover the bedroom radiant heat cement slab. https://www.homedepot.com/p/Heritage-Mill-Cobblestone-Plank-13-32-in-Thick-x-5-1-2-in-Wide-x-36-in-Length-Cork-Flooring-10-92-sq-ft-case-PF9656/2047

May- Heritage Mill, Cobblestone Plank, click-lock, cork flooring was used to cover the bedroom radiant heat cement slab. This was the easiest floor I ever put down- loved it. Nice and tight!

June- Kitchen tiles going down. What a tough job.

June- Kitchen tiles going down. What a tough job.

Wide view of the kithchen tiles. The center island was removed for this. The tiles took 5 days to lay and two days to grout. Well worth the effort to go diagonal, pine-wheel layout.

Wide view of the kitchen floor. The center island was removed for the tile installation. Working alone the tiles took 5 days to lay and two days to grout. Well worth the effort to go with a diagonal, pine-wheel layout.  (Aspen Sunset porcelain tiles from Lowes). 

At the end of July a tin ceiling was installed with a cove molding surround to complete the look. Product purchased from American Tin Ceiling in Florida.

At the end of July a tin ceiling was installed with a cove molding surround to complete the look. Product purchased from American Tin Ceiling in Florida.

Summer was fast going by and in the middle of August I finally ran 75 feet of this Rehau- duel, 1 1/4" insulated, PEX tubing , between the basement and the Pavilion. The Pavilion will house the future wood boiler. A 10 inch culvert, 3 feet deep, was run the whole way and the Rehau was pulled through that.

Summer was fast going by and in the middle of August I finally ran 75 feet of this Rehau- duel, 1 1/4″ insulated, PEX tubing , between the basement and the Pavilion. The Pavilion will house the future wood boiler. A 10 inch culvert, 3 feet deep, was run the whole way and the Rehau was pulled through that.

The basement end of the Rehau insulated PEX. Note the the brass 1 1/4 inch valves (middle right) ready for the hook up into the primary heating loop.

The basement end of the Rehau insulated PEX. Note the the brass 1 1/4 inch valves (middle right) ready for the hook up into the primary heating loop.

At the end of August my next project "The Pavilion" was well under way. 4" PVC and 2" stone surround the slab for good drainage. Drains to daylight.

At the end of August my next project “The Pavilion” was well under way.
4″ PVC and 2″ stone surround the slab for good drainage. Drains to daylight.

This was right before the pour. 1/2 rebar was installed at 16" centers as well as extra bar around the perimeter and wire mat in strategic areas. 4ml plastic was used to control curing, The pour was done in three sections with 2x4" screed guides in place.

This was right before the pour. 1/2 rebar was installed at 16″ centers as well as extra bar around the perimeter and wire mat in strategic areas. 4ml plastic was used to control curing, The pour was done in three sections with 2×4″ screed guides in place.

September- the cement crew.

September- the cement crew. You can’t do this alone.

My brother George has experience in building rock walls so I corralled him into helping me for this job. We did about 20' of wall in less than 2 days. I was thrilled to get this done becasue the area has been an eye sore for years and this was the final piece of the overall landscape plan.

My brother George has experience in building rock walls so I corralled him into helping me for this job. We did about 20′ of wall in less than 2 days. I was thrilled to get this done because the area had been an eye sore for years. This was the final piece of the overall landscape plan.


20
Sep 15

Building the bedroom additon.

It was the beginning of July and I was anxious to get started on the bedroom addition. The only thing stopping me was an obnoxious 7x16x8′ storage shed and kiln attached to the side of my house where the bedroom was supposed to go. BlgKitch26It served me well over the years but it was built for when the building was used as a workshop/garage. I had taken all the hardwood “Lightning Strike Cherry” out of the kiln in May but there was a lot of other lumber and crap left to deal with. You know the kind of building stuff you can’t throw out because you may need it some day? I was in denial about the problem of finding a good place to store all of it, not to mention the additional lumber from dismantling the shed itself. Like maybe I could just neatly pile it all up and cover it with a tarp? It didn’t take long to realize that idea was half-assed, the tarps would blow apart eventually and anytime I wanted to get something from the storage pile it would be like major surgery. Building another lumber storage shed was the only way to go.

New lumber storage shed.

New lumber storage shed.

So first things first and I built a new storage shed, keeping it simple going with an open-air design. That only took a couple days and then I started to remove the old shed. Fortunately for me it was mostly put together with screws so it came apart fairly easy and I was able to salvage almost all of the material including the screws. All this took a couple weeks in between camerawork jobs. By the last week in July I was ready to dig the foundation for the new bedroom.
About the same time I got a call from a clients asking me to do a 10 day job shooting in Hawaii for mid-August. Now that was a impossible opportunity to turn down. I am not a big fan of travel jobs at this point in my career but Hawaii? So I accepted the job and started to rethink my bedroom addition timeline. I was flying out on August 4th and returning on the 14th. If I could at least get the foundation pour done before I left for Hawaii- that would allow me to enjoy myself while working there and make me feel less stressed when I got back.

Starting the bedroom addition excavation.

Starting the bedroom addition excavation. “The Max” allows me to truck away the spoils and keep the job site clear.  The back-fill after the concrete pour will be sand and gravel.

It is always a little unnerving when you start to excavate because there is no turning back- unless you are a quitter. Quitting was not an option bad hips or not. On Saturday, July 25th I began the excavation and worked straight through till the foundation pour on the following Saturday, August 1st. At first I thought I could get it done in time but then on Tuesday the rains hit hard. Not all day rains but hard soaking thunderstorms that would cause big water runoffs. The secret to working in a trench is to have your drainage pipe set in the bottom and covered with clean stone. That is the first thing you should do, so when water does runs down into the trench it has somewhere to go and not fill up the hole like a bathtub. On the first leg of the foundation I tied into the existing living room foundation line that drained to daylight. Because of my sloping property, all my foundations drain to daylight, if possible it is always the way to go.

Bedroom addition foundation drain.

Bedroom addition foundation drain. Running water through too confirm that it’s clear after a soaking rain. Drain is lower than the footer.

BlgBd30

Interior form wall. The lower metal will not be removed after the pour. Note the tarps around the trench walls to prevent muddy water from flowing into the hole during rain storms.

Another trick I use is to take old tarps and drape the walls of the trench so when the rain hits it doesn’t make so much mud. Mud is a battle that sucks you in, slows you down and saps your energy. You must prevent the mud from mixing with your clean stone as it compromises the perforated pipes’ ability to drain. So when your hustling and hurting, to watch the deluge hit is pretty sobering. You better be prepared. The rain knocked me back a bit. BlgBd31I was building the forms as I went and moved that process inside the garage to work during rain events. I made some calls and put a guy on standby to help me with the cement pour- if and when it happens because I still didn’t know if I could get it done before the Hawaii job.  When I called my normal concrete delivery company to put them on hold, I found out they went out of business. The next two companies I called said  the house was too far away. I pleaded with one lady and she said, “You won’t be able to work with the concrete by the time it gets to you.” Starting to feel sick I wracked my brain. I remembered seeing another company’s trucks around from the past and then visualized the name, they were not in the yellow pages but buried in the white pages. Great- they could do the Saturday delivery. Whew- now get the forms in.
A critical part too any building addition is ensuring that it is square to the existing one. With modern calculators it’s no big deal to find the hypotenuses of a right triangle and check for square. What is a big deal is actually holding onto two tape measures, alone, while standing in a hole and trying to position a form. You only need to be concerned about one leg at time but the thing that kept screwing me up was that the inside room dimension was a even 12×16′. The walls were going to be 8″ thick for an outside dimension of 152″x 208″. So for example the long wall leg, depending on what point I was measuring could be 192, 200 or 208″. The short wall could be 144 or 208″. The hypotenuse would change accordingly. The point is I was juggling a lot of balls in the air, watching the sky and trying to pour cement by Saturday. Your mind is going a lot of different places. I was putting the last outside corner form in place when something didn’t look right. WTF? Come to find out the 16′ inside corner form was too long. To make matters worse, I had it all secured in place. The only thing that saved me was I hadn’t back-filled the inside form. Fortunately there was enough room inside the trench to smack back the short leg then cut down the long form to the correct size and keep it all level. One hour later I was back on track but oohh-wee some crazy alternatives had sailed threw my head and then fortunately kept on going.

Finished new bedroom foundation.

Finished new bedroom foundation.  Inside dimensions 12′ x 16′

The concrete was poured on Saturday and I ended up with a very well drained, insulated, substantial foundation. I couldn’t be happier.
I just quickly want to discuss the version 2.0, John Davis, method of pouring a frost wall foundation. The inside form is permanent. It is constructed out of two layers of excess or used metal roofing. One layer is vertical ribs screwed to a second layer of horizontal ribs, which gives it strength to support the forces of gravel back fill. Each length of metal panels are screwed to a 2×12″ top plate. The wood top plate is perfect for lining up and leveling everything into place. The outside form is a double -sided, plywood, 2″ x 4″ wide panel with 2″ rigid foam insulation attached to the inside of it. Big rock goobers are placed in the bottom of the trench. 5/8″ holes are hammer drilled into the goobers and 1/2″ vertical steel rebar is pounded into the holes. Horizontal lengths of rebar is then attached to the vertical rebar. The bottom of the trench v’s out and is held apart by the big rocks. That becomes the footer. The outside form wall is back-filled with sand and the inside wall is filled with gravel. The outside wall is held in place at the top by wood spacers. Braces are placed on the inside top 2×12″ to stop the forms from moving during the pour. The concrete is vibrated down at the bottom of the trench when the cement is poured filling all the voids.

The John Davis method Version 2.0. Pulling out the form after the pour.

The John Davis method- Version 2.0. Pulling out the form after the pour.

After the pour- the next day- the outside form sand is partially excavated and a chain is strategically attached to the form. The form is gently pulled out and away by the backhoe, leaving the 2″ rigid foam insulation pressed against the concrete foundation wall. Nails were put through the rigid foam and let set into the concrete, preventing the foam from pulling out with the wooden form. The forms are held in place by the backfill. The backfill is not compacted allowing the forms to V out at the bottom somewhat from the pressure of the wet cement during the pour, creating a nice big footer. Voila!  Why do I do it this way? I hate bracing forms and I don’t have to worry about any of them blowing out or moving during the pour. I have seen it happen.

Insulated foundation wall.

Insulated foundation wall.

Next stop Hawaii!!

The Primalux Hawaii Crew.

The Primalux Hawaii Crew.


It was August 15th and the next order of business was to insulate the radiant slab and its’ perimeter, install the rebar, run the PEX tubbing, then pour the 6″ slab.   Two years earlier, before I poured the dinning room slab, I ran some 3/4 inch tubing that went from the radiant floor heat manifold, under the slab to what was then the outside of the building, or about 14′ to where the new bedroom would eventually be.

6 individual 3/4" loop run guides, installed from two years earlier.

6 individual 3/4″ loop run guides, installed from two years earlier.

These guide tubes were well insulated and just big enough to let me push through the 1/2″ PEX tubing. It actually worked as planned and I was able to do this.

Insulating the radiant heat slab was critical and I went a little overboard. Here is what I did; the first layer was a product called Insul-Tarp® which is supposed to be a miracle insulating, vapor barrier for cement slabs. It is controversial in regard to it’s insulating properties but it is not too expensive and I believed it to be an excellent vapor barrier. What ever insulating properties it could have- all the better. I had some  used 1″ rigid foam insulation salvaged from the old wood kiln and used one layer of that over the  Insul-Tarp®. The final layer was shiplapped 2″ rigid foam, for an approximate R-value of 15 to 19, depending on how you rate the Insul-tarp.

Three layers; Insul-Tarp, 1" ridged foam insulation and then 2" foam insulation.

Three layers;   Insul-Tarp,  1″ rigid foam insulation and then the final 2″ rigid foam insulation.

BlgBR1While doing this I had nice dry weather but lots of rain was in the forecast. Because of all the insulating layers used I was worried about water getting trapped above the vapor barrier and even floating my rigid foam around. So as much as I hated to do it, I covered the area with tarps. All the rebar and PEX tubing was installed under these tarps. This pain in the butt, trapped water issue was to follow me till the bedroom roof was covered. Trapped water under a radiant floor slab can cause heat to suck away- so to speak- don’t want that.

The next consideration was the rebar. As a rule, rebar should be closer to the surface of the cement than the bottom for crack prevention but my main concern was to use the rebar as a fixture for my PEX tubing. I had read the previous winter in an article found on the web that the Pex tubing should lay closer to the bottom of a 6″ slab. With this in the back of my mind I installed the steel rebar 2″ above the bottom at 16″ centers. Then I connected wire mesh on top of that, which allowed me to place my PEX on 8″ centers. The 8″ spacing was called for in my heat loss study and is pretty standard for homes. The problem was I started to second guess myself and went back to Siegenthaler’s hydronic heat bible just to double check. I got the cart before the horse on this one. Unlike the article I read on the Web,  Siegenthaler’s book recommends the tubing should go closer to the top for a faster response time. Well, raising the steel, after the fact was not easy to do, especially alone. First of all, the rebar ends were inserted into holes drilled into the walls and the wire mesh won’t let you put your foot down for proper leverage- not fun. In the end, I was able to get most of the PEX two inches from the top but it was not easy.

The next step was to run the 1/2″ O2 Barrier HeatLink® UV Stabilized PEX-a Tubing. I needed to run two individual floor loops and I wanted a wall radiator for quick heat response time for when I came back from being away from the place. There are different ways to run the floor loops but my idea in this case was to run the loops starting from the outside walls where hotter water would be needed and work my way into the center where the bed would be located and therefor less demand for heat.

1/2" O2 Barrier HeatLink® UV Stabilized PEX-a Tubing.

1/2″ O2 Barrier HeatLink® UV Stabilized PEX-a Tubing.  Note the 50 lbs. old elevator weights in the center to keep down pressure on the layers of insulation. These weights are removed as the cement is poured in the center.

Guide boards to break up the pour into 7' sections.

Guide boards to break up the pour into 7′ sections. Note insulation on side walls.

Finally I had to install some leveling guide boards in the center to break up the pour into two, 7′ sections with a final go back and fill 2′ center. It worked according to plan with my 2 local hire helpers. In fact, it was the smoothest finish pours I ever did.

The finished bedroom, radiant floor slab and foundation.

The finished bedroom, radiant floor slab and foundation.

All this was done in time for Labor-day weekend!


I poured the radiant slab floor in the bedroom addition on the Friday before Labor Day weekend. The cement truck pulled out by 1 p.m. and I paid and released my crew. As I was floating the concrete, I heard the lumber delivery truck roaring up the mountain. I rushed down the driveway to greet him and discussed how to unload the truck. It was a full size tractor-trailer with a Moffett forklift hanging off the back. He was 2 hours early but better late than never or something like that. The driver probably didn’t want any delays screwing up his holiday weekend either. I rushed back to finish my cement float finish job while he unloaded the truck. By the end of the day, I got so far as too attach the pressure-treated sill plates to the foundation. It was a great day.

I haven’t mentioned the design of the new bedroom and how it was meant to integrate with the house, so here it is: All the buildings that make up my “town” have either a 5/12 or a 10/12 roof pitch or a combination of both. Meaning the roof slops down 5” over 12” horizontal inches and the steeper pitch of 10” sloping over 12” horizontal. So those were my choices. You do not want to introduce a new roof pitch for something like this, as it will look wrong. The roof above where I was attaching the bedroom had a 10/12 pitch and I considered connecting to that and just continuing the slope out. The other option was to break the slope to 5/12. My drawings of the two options convinced me that breaking the 10/12 to the 5/12 pitch was the way to go. That way my outside bedroom wall could remain a full 8 feet high. As I look at it finished now, I am glad I made that decision.

When I had my epiphany three years ago and visualized the new compound, I chose to go with 2×8” walls for all new construction as opposed to the old 2×6” walls. That way, I could use a snug fit R30 insulation in the walls. With the amount of windows I was putting into the design, I could use the extra R-value. The other consideration for the new bedroom was to keep the windows low enough to see what was going on outside. There is nothing like lying in bed and looking out the window to watch the wildlife nosh away on the landscape (unless it is deer eating your shrubs).

I planned rows of recessed lighting on all four walls, with two independently controlled reading lights for each side of the bed.
Since this was my last hurrah for the new big house, I decided to go with a hardwood beam treatment for the ceiling. That would involve two 8×8” beams going down the ceiling and parallel to where the edges of the king bed would be. Then there would be two perpendicular rows of 4×4” beams going the other direction creating a hatch work look, with a ceiling fan in the middle. The upstairs bedroom has 8×8” maple beams, so this idea would integrate the house.

Placing the first bedroom wall with my backhoe.

Placing the first bedroom wall with my backhoe.

I had my first wall up by the end of Labor Day weekend, so things were going good with my plan to have an enclosed bedroom before the snow flies. You always have to plan ahead and I was thinking about those beams and how I was going to get them up. The 4×4” beams were not a problem but the 8×8” beams were something to consider since I was working alone. I figured if I had them ready to go before the roof was on, I could use my backhoe to put them in place. But that meant I had to have the beams, which I didn’t–they were somewhere out in the forest. Fortunately I had a lot of choices for trees to make the beams, as there was one section of my land that was still strewn with blow-downs from Hurricane Sandy.

Maple tree blow down from Hurricane Sandy.

Maple tree blow down from Hurricane Sandy.

It is one thing to look at a tree and think it is suitable and another thing to cut it up with a chain saw and find out it is no good. No good because the log is hollow or has some decayed wood. My first three attempts proved unsuccessful and I was annoyed. You want to find a tree that is big enough, straight, no knots and still alive. Even though a tree is lying on the ground, many of them still had leaves as their root balls were partially attached to the ground. Live trees are less likely to have started to decay and have fewer insects attacking them. The next trip back to the woods proved successful and I dragged out a few options for the 8×8” beams. The 4×4” were much easier to find and deal with.

Once I had my logs out of the woods I needed to get them cut up and that meant getting them to Bandsaw Bob’s Sawmill. Robert was 12 miles away and I had “The Max”- a 4×4, one ton, 350 Detroit diesel dump truck that could handle the load, but it had no plates. Do I risk it and take the back way–a seasonal road over the spine of the mountain–or hire Robert to pick-up and deliver the logs? Robert would prefer I do the hauling; he has helped me out before but I didn’t want to go knocking too often—my need might be more urgent next time. The last time I took this clandestine trip with the lightning strike cherry logs, The Max almost didn’t make it back. I was so nervous I thought I was going to throw-up on that trip. Since then I have repaired the truck, but still–it’s a rusty 1996 and doesn’t get used that often.

"The Max" ready to roll.

“The Max” ready to roll.

So early one fall morning at 7 a.m., with my heart pounding and a pit in the bottom of my stomach, I took the chance and headed down my mountain road with a load of logs. At the bottom of the mountain I had to go onto a more frequently traveled road. At the intersection, the coast was clear and I made the risky ¾ mile jaunt before I turned up the mountain road that took me to Bandsaw Bob’s. That all went fine and I didn’t run into any other cars, but on the way down his mountain toward the mill I became concerned about the brakes–smoke was coming from somewhere and there was a strong smell of burning brake pads. The brakes were one thing I had made sure were working properly when I originally bought the truck; I had spent about a thousand bucks on getting them tip-top. I didn’t want to attract any attention but I had to take it much slower, keeping it in 4×4 low and using the engine backpressure to slow me down. The brakes worked but they were hot! I made it to the sawmill undetected.

Bandsaw Bob"s Sawmill in action.

Bandsaw Bob”s Sawmill in action.

"The Max" is ready for the return trip. Loaded with Maple beams and 1x White Pine for siding.

“The Max” is ready for the return trip. Loaded with Maple beams and some additional 1x White Pine for siding I bought from Robert.

The seasonal road that goes over the mountain spine is one lane and hugged by trees. As luck would have it, on the way back, I ran into two huge Town Highway trucks that were working on getting the road in shape. Luck can go two ways and fortunately for me, each time I ran into a truck, there was a small area in the forest for me to pull over, leaving just enough room for them to squeeze by. Otherwise I would have had to back up for who knows how far to let them pass me by. Whew! I made it safely home with my new beams.

8x8" Maple beams for the bedroom ceiling.

8×8″ Maple beams for the bedroom ceiling.

BlgBed43By the middle of October, I had the roof on, things were looking good, and I raised the bar to get the siding on before winter. About the same time, the Pope came to town and for my real job as a TV cameraman, I had to chase after him one night working for Inside Edition. We didn’t have the right credentials so I never saw the Pope, but not wanting to go back empty-handed, the producer got the bright idea to interview Bernie Kerik– the fallen former NYC Police Commissioner–and get his comments on protecting the Pope and terrorism. Problem was he was on the East Side and we were on the West Side. I said let’s drive and she said we wouldn’t get there in time because of road closures. I disagreed to no avail. So we walked south maneuvering around all the barricades, fighting the crowds, then back up North. Me, with a 30-pound camera and bad hips no less. We got the interview and then had to walk all the way back to where our vehicle was parked on the West Side. The next day I wasn’t working and left my apartment to go somewhere. I had to turn back. I could not walk–my left hip just wouldn’t let me. It locked-up. This had never happened before. I struggled back to the apartment, got on the phone and scheduled an appointment with my hip surgeon. I said I wanted hip replacement surgery as soon as possible, wanting to be able to travel for the Christmas Holiday. They had a cancellation for November, Friday the 13th. I laughed and said, “Perfect!”

By that afternoon, my hip loosened up and I was able to walk-limp around. This changed things as far as my construction timeline. Two of the three bedroom windows were in but I still hadn’t ordered the final big 6×4’ window. That window was the next thing on the agenda, but it wouldn’t arrive for four weeks. It was too late; that would be just when I was going under the knife. I cancelled that idea.

New bedroom with temporary door where the 6x4' window will go.

New bedroom with temporary door where the 6×4′ window will go.

But I was able to get the bedroom almost completely sided and I put a temporary door where the window was to go. This temporary door was the only way to get in. I did not want to break down the wall and put a door into the house as the new bedroom was not yet insulated.

BlgBed41

November 2015 , before hip-replacement surgery.

So things worked out all right. I got the house to a point that made sense form a selling point of view- it was now a two-bedroom, two-bath house. Just in case anything happened to me during surgery, I did not have to worry about Deb trying to explain my dream to a realtor or anyone else.

View of the new bedroom.

View of the new bedroom.

December 2015


08
Feb 15

Winter 2015

"The Max" is finally being put to the test after being out of service last winter.  1 Ton Chevy dump. 4WD.

“The Max” is finally being put to the test after being out of service last winter. 1 Ton Chevy dump. 4WD.


This is as far as I got on the porch and deck project from 2014. Didn't get time to finish the front siding and deck rails before the winter weather hit.

This is as far as I got on the porch and deck project from 2014. Didn’t get time to finish the front siding and deck rails before the winter weather hit. Working inside the new kitchen now. Getting ready for the cabinets that will be delivered by April. Very exciting.


01
Feb 15

Workshop to kitchen transformation.

Of course while working on the entryway I was formulating my plan for the kitchen. I knew where the sink, counter, refrigerator, and island stove were going but what the heck was I going to do with the ceiling? The old workshop ceiling was 10’ tall. The living room on the west side of the kitchen had an 8’ ceiling and the dinning area on the east side had an 8’5” ceiling that sloped down to 7’. I hated to just lower the high kitchen ceiling down to 8’ 5”. I wanted a tin ceiling in the kitchen but not throughout. I knew from installing the tin ceiling on the 2nd floor that it was not easy. When working with tin ceiling panels, the larger the area the harder it is to keep the lines straight. I don’t care how many lines you snap- especially when working alone and not being an expert, the tin panels will want to wonder. The answer was a large soffit surround that would blend all the ceilings together and leave a nice 10’ high rectangle in the center for the tin ceiling. The soffits have an added benefit in that they are a great way to run wiring and recessed lighting. A lot of work? Hell yeah! But what the heck- nothing has been easy so far.

The kitchen soffits framed in.

The kitchen soffits framed in.

When using new lumber straight from the yard you need to be concerned about the woods moisture content. I did not want to spakel and sand before the wood had acclimated to the surroundings, otherwise you can get cracks in the sheetrock joints later as the wood shrinks and dries. Winter is a good time to let this happen and I got the 2×4’s down to 9 or less on a moisture meter scale. Buying wood from a place that stores lumber indoors is a good idea if you are in a hurry.

This photo below shows my method of installing 5/8″ fire code sheet rock solo. These are called grip stands and are used in film & TV production for lighting. You raise one side a little and then go over and raise the other side, back and forth till it reaches the ceiling joists. I have never lost a piece of sheet rock since I started using this method.

Installing 5/8" sheet rock on the 10' ceiling solo.

Installing 5/8″ sheet rock on the 10′ ceiling solo. Dinning area in background.This room had been my workshop for over 12 years. Reorganizing all the accumulated stuff was overwhelming at first but I just slowly chipped away at it and it was not so bad.    The wood furnace in the dinning area will be replaced with a small glass door wood stove.

This is a 6" Tjernlund in-line fan to move hot air from the woodstove into other rooms.

This is a 6″ Tjernlund in-line fan to move hot air from above the woodstove into other rooms. The intake will be on the left photo.

Having these large soffits allowed me to install a warm-air handling fan and duct-work. The filtered intake side is directly over the wood stove and it will move this air into the living room or bedroom or both. The fan control is wall mounted, 4 speed and you can not hear it at all on low. High is noisy at the intake side.

Two types of Halo 4" recessed light units. Remodel on the left and New Construction on right.

Two types of Halo,  4 ” recessed light units. Remodel on the left and New Construction on right. They cost about the same and these take an incandescent bulb. The spring clips on the left can be a challenge to install and are not to be taken lightly.

Lighting is a big deal in the kitchen for any home and recessed lighting is the way to go.  This is a photo of two options; the remodel version on the left can be added to an existing ceiling but could be changed in the future and the new construction one on the right that could not be swapped out without ripping up the ceiling. I put this remodel version directly over the sink in case I wanted to change it for some reason. Why would you want to change it? There is a revolution going on with lighting now and LED is the rage. These units are for tungsten bulbs but both can be retrofitted with LED lights. In the past the color of LED lights was a problem but not anymore. Check the box. I wasn’t sure which way I wanted to go so I went with these so I could go either way. I am big on using dimmers and LED’s do not change color temperature when they are dimmed unlike tungsten bulbs which become warmer in color as they are dimmed down. The Cree brand of LED lights I bought from Home Depot and retrofitted for some of these kitchen lights have a slight buzz when they are dimmed way down low. The kind of buzz you would only notice when it is quite. If you are cooking or talking etc. you wouldn’t notice but it could be a problem in a bedroom or someplace you wanted to read or sleep.

Kitchen 2x6" sink wall.

Kitchen 2×6″ sink wall.

I went with a 2×6″ sink wall to allow for the plumbing. Especially the 1.5″ vent pipe for the kitchen sink and bathroom shower behind the wall. I put bridging in between the studs where the counter and cabinets will be attached to make it beefy and give me fastener location options.

To say I was totally confident about my kitchen ceiling design would not be correct. I thought maybe the soffits were too big and would overwhelm the look. What I am happy about at this point is the way the ceilings from the adjoining rooms flow into the kitchen. One is 8′ and the other is 8’5″. The soffits do create strong visual lines for a unifying design.

Now the Kitchen is starting to like like something. Not sure if I am happy with the look yet but I am feeling better.

Now the Kitchen is starting to like like something. Not sure if I am happy with the look yet but I am feeling better.


Tin ceiling tiles come in few different installation types. Nail-up is the traditional way but it requires furring strips underneath. I used nail-up tin tiles upstairs with the backing 12″ on center. Since then I discovered a new type called Snap LockTM. This style is available at www.americantinceilings.com in Florida.  I recommend this company.
Snap LockTM tin ceiling tiles have an interlocking flange system that allow the tiles to snap together. The beauty of this system is that no furring strips are needed and they screw directly into dry wall so you can install them into an existing ceiling with no modification.  The style I purchase were 2’x2′ finished in Copper Penny. 100 sq.’ for less than $500 delivered.

Snap Lock tin ceiling tiles being installed solo with the help of my grip stand rig.

Snap Lock tin ceiling tiles being installed solo with the help of my grip stand rig.


Snap LockTM tiles are the best style to install alone.

Because of the interlocking system the tiles are thicker around two sides so I used a filler to maintain the correct depth all around. This also helps when I put up my crown moulding.

Because of the interlocking system the tiles are thicker around two sides. When you trim a tile a filler is used to maintain the correct depth all around. This also helps when I put up my crown moulding.

This is the intersection of three tiles. It is very tricky to maintain a consistent gap and follow the snap line. I think it is a good idea to ignore the manufactured hole and screw directly into a joist where possible.

This is the intersection of three tiles.

It is very tricky to maintain a consistent gap and follow the snap line. The folks at American Tin Ceilings told me the gap is important or you will screw yourself eventually. They also said not to get carried away trying to get your recessed lighting to line up with the squares in the tiles. They were right. I think it is a good idea to ignore the manufactured hole and screw directly into a joist occasionally. I’ll put in a photo of the finished job when the crown moulding is up.

10 KraftMaid, full plywood construction cabinets.

10 KraftMaid, full plywood construction cabinets.

My experience with ordering kitchen cabinets from Home Depot was kind of mixed. I went into the local store right after the new year with my drawing and cabinet schedule layout just to get a ballpark idea of what the cost would be. I knew for sure I wanted custom KraftMaid full plywood construction cabinets. I knew the color and style. The salesperson was a little put off because she wanted to help me design my kitchen. It was a good size order and I am sure Julie would of enjoyed helping me but I had already been there and done that with my city apartment kitchen renovation. The Home Depot designer back then was a big help and I learned a lot from that experience. The problem started when Julie told me KaftMaid was having a big sale that ended in 3 days. The sale amounted to over $1000 in savings. I felt good about my design but had planed on looking at the prices and mull over some different options. No time to tweak- I had to place the order. The thing was I didn’t need the cabinets for three months at the earliest.

All plywood construction is worth it if you can spare the cash. This view is a base cabinet flipped upside down. This would all be made of OSB instead of plywood. These cabinets are much sturdier than OSB. But once it is place who cares? It is up to you. $1000 extra for 10 cabinets all plywood construction.

All plywood construction is worth it if you can spare the cash. View of a base cabinet flipped upside down. Cheaper cabinets would all be made of OSB instead of plywood. These cabinets are much sturdier and heavier than OSB but once in place who cares? It is up to you. $1000 extra for 10 cabinets all plywood construction.

As time went by I realized I had made a mistake about the pantry wall and base cabinets- they weren’t big enough. I knew it wasn’t going to be easy to change the order but after about a month I went into Home Depot and talked to my sales rep and see if I could get her to make the change. Julie figured out the cost of my changes and it negated the discount I had received. She did not have the authority to change the discount codes. Unlike helping to design kitchens- this was a major pain in the butt to her I am sure.   Julie went and got the store manager. I explained to the manager that KrafMaid had called me to confirm the order and said they wouldn’t start to make my cabinets till March. It was the beginning of February so he called them up and explained the situation. They all agreed the change would be OK and I blew a big sigh of relief! I had been there for over two hours and finally the manager looked at me and said, “This is going to take some time and you should come back.” Discount codes are not to be taken lightly. Sorry.

The kitchen construction schedule plan was to get the sheetrock up, sanded and primed, followed by putting up the tin ceiling, finalize the sink wall plumbing and then start with the cabinets. First I needed to fix the floor where the sink wall base cabinets and also the stove island cabinets were to sit. These were actually 4″ deep rectangular holes left from the radiant floor heat install and thinslab pour. You do not want to heat these areas.

Freshly puored cement for stove island location. Electric and gas lines are visible . Perimeter has PT 2x on edge for attaching cabinets to floor.

Freshly puored cement for stove island location. Electric and gas lines are visible . Perimeter has PT 2x on edge for attaching cabinets to floor.

The sink wall bass raised 1.5 inches for the tall guy who washes the dishes.

The sink wall base raised 1.5 inches for the tall guy who washes the dishes. If you read the book on installing kitchen cabinets they talk about this option. Stove countertop needs to be standard height of 36″ but not the sink countertop. This will be 37.5″. Deb doesn’t mind and it makes a big difference to me.

BlgKitch14BlgKich16After the cabinets were put in it was time for the counter tops. I had seen a photo in the friday edition to The WallStreet Journal of a white kitchen with dark, hardwood countertops. That was my inspiration for this kitchen and I had just the hardwood for it. In June of 2012 a large bolt of lighting struck what must have been a 150 year old cherry tree outback. The lighting had blown out a large strip of wood from top to bottom. I found chunks over 200′ away. The tree was killed dead and with it all the ground cover from the leaf drip line to the trunk. This was not the kind of tree that a logger would ordinarily use for lumber because the tree trunk branched off too quickly. I couldn’t see letting it go to waste, so I cut it down in the fall and had it sawed up into lumber. Sure enough it wasn’t the best stuff, too many knots and checks but I was able to find some usable stuff. I named this hardwood- “Lighting Strike Cherry”

"Lightning Strike Cherry"

“Lightning Strike Cherry” The butt of this tree was over 3′ in diameter.

BlgKitch17These are 1×8″ cherry planks. Ordinarily hardwood countertops are 1.5 or 2″ thick, narrow strips glued together but I am not set up for woodworking and this seemed like the way I could pull it off. The plan was to glue and screw these 1″ planks to 3/4″ plywood, giving me a finished thickness of 1 3/4″. Then gluing and nailing a 2″ face surround. Both the cherry and plywood were down to a moisture content of 6. The problem for me with using narrow strips of hardwood was the sanding. I just have a 3×21″ belt sander and didn’t think I could sand it all down as smoothly as I would using this method. Also the nightmare of working alone and trying to line everything up during the gluing and clamping. This was hard enough as it was and I think I got lucky.

The planks are first edge glue with waterproof glue and then face glued to the 3/4" plywood.

The planks are first edge glue with waterproof glue and then face glued to the 3/4″ plywood.

I am not sure if I needed to screw this together but I did, drilling pilot holes very carefully so the screws do not split the hardwood. Out of all these screws only the tip of one came through which sanded down to being unnoticeable. The weight is added to help prevent any warping.

I am not sure if I needed to screw this together but I did, drilling pilot holes very carefully so the screws do not split the hardwood. Out of all these screws only the tip of one came through which sanded down to being unnoticeable. The weight is added to help prevent any warping. Kraft paper underneath stopped the counter top from sticking to the cardboard and could be easily sanded off.

Test fitting the Elkay sink. This type of sink is designed to be top mount or under mount.

Test fitting the Elkay sink. This type of sink is designed to be top mount or under mount.

To say installing this sink was easy would not be correct. The problem was the manufacture- Elkay and I had two different ideas about how it should be done. In the end we met in the middle. Elkay wanted a sink cut-out that was 3/8th inches smaller than the outer edge of the sink. That would of been much easier but structurally I hated the idea.

Ready to install the Elkay top mount sink.

Ready to install the Elkay top mount sink.

One of eight camps securing the sink.

One of eight camps securing the sink.

You can see by looking at this sink cut out that there was a lot of screwing around. I do not want to go into all the details except to say that the problem came in regard to the clamps. Note the 1/2 inch holes drilled around the perimeter of the sink cut-out. The clamps are attached to a slot on the underside of the sink and they can move in the slot. Nightmare to line this up by myself with the silicone chalk. There was a lot of cleaning up to do but in the end it turned out good.

4 coats of diluted Epifanes high gloss varnish and a final 2 coats of Epifanes rubbed effect varnish were used to finish the counter tops.

4 coats of diluted Epifanes high gloss varnish and a final 2 coats of Epifanes rubbed effect varnish were used to finish the counter tops.

The huge consideration about wood countertops is water contact issues. There are different opinions on how to finish wood for counters but no one that I have come across disavows the use of wood. I went with Epifanes marine varnish from Jamestown Distributors based in Bristol, RI. It is also stocked in local marine supply shops. The product costs over $40 per quart or 1000ml. This is the sort of varnish used on the deck and hull of a wooden boat, so constant water contact is a given. Scratches do not concern me and dings and dents over time will only add character. An occasional reapplication of varnish over the years is a given.

"Lightning Strike Cherry" kitchen countertop.

“Lightning Strike Cherry” kitchen countertop.

By this point it was the end of June and I was way past my schedule to start the new downstairs bedroom. My left hip had become a constant source of pain throughout the winter and spring. Limping around had become the new normal and my right hip was letting me know it was compromised also. I had gone to see a hip surgeon in February. I told him I wanted to try and build a bedroom addition before I had a hip replacement. Dr. Ranawat looked at me skeptically and said, “You are going to need a hip replacement and you can do it now or you can do it later but you will have to get it done.” I did not doubt his assessment. My reason for delaying were two fold; I needed to make more money and I felt like this new bedroom was critical to the value of our property. If anything went seriously south during or because of the operation at least the bedroom would be a reality. The thought of digging a foundation, climbing in and out of the hole along with climbing up and down from the backhoe made me cringe. Then the thought of climbing around on a pitched roof in cold weather made me cry. So my plan was to just take it one step at a time and stop if I had to.


12
Jan 15

Entryway

After thanksgiving I moved inside and started on my winter projects. Transforming the workshop into the kitchen was my big goal but I had to finish the entryway first. The ceiling had to be sheet rocked, 2 walls re-rocked, lighting and electric finalized and the chimney enclosed. All that went fairly smoothly and with a big push the entryway was sanded and ready for paint by New Years Eve. Sanding spackle is hard and I was in bed by 9:00 PM.

View from the doorway with stairs to the second floor.

View from the doorway with stairs to the second floor bedroom.

Is anything ever finished? Yes I believe it can be but in this case a couple of issues still need to be tweaked in the future; the doorway to the kitchen hallway was not finalized because I want it as wide as possible but this is compromised by the fact that it needs to butt up against the chimney enclosure and the radiant floor heat controls- not the best situation. I left it wide, 38” and will finalize the framing and trim when I put the bi-fold doors on the heat controls. Secondly, the plan is to put the dryer to the right of the chimney enclosure, where it is easy to get at and can vent within inches to the outside. The problem is the little window there is preventing me from enclosing it properly- would hate to remove the window- so I will work that out in the future.                                                   Finally there is a two inch step up into the kitchen hallway because of the need for two inch, rigid foam insulation added to the floors on the rest of the house. People can trip over something like a 2” step-up, so I may pour a slope of concrete and then tile over the whole thing. The entryway floor could not be raised because the existing 2nd floor stairs would not be the right height to the first step and the floor did not need insulation because it was installed underneath from the beginning.

The electric clothes dryer will go in this corner. Note the problem window.

The electric clothes dryer will go in this corner. Note the problem window.

As is often the case I have too many other things to worry about and winter will be over if I let these three things bog me down. Thinking about my five-year plan, I am almost a year behind schedule because I put the porches on during the summer and spent so much time landscaping in the spring. These things needed to be done and were an important part of making the property valuable but they were not part of my original 5-year plan.

Strange- but something I think about- if I would accidentally die and Deb would be left with my debacle. I want the property to make sense so that if and when she sold it, people would get what I was trying to do. Having two houses that don’t make sense and me in the grave keeps me moving-on.